Saturday, December 17, 2011

포토샵의 Rotate View tool

질문 : 포토샵에서 간혹 나타나는 나침반 아이콘은 무엇인가?
답 : 그것은 Rotate View tool 로, canvas 를 회전시켜주는 툴이다.
이걸로 돌리는 건 캔버스일 뿐, 이미지 자체를 변화시키지 않는다.
핫키는 R이고, 툴박스에서는 hand 툴(핫키 H)과 같은 곳에 있다.
돌린 것을 Reset 하려면 Esc를 누르면 된다.
인용 : Use the Rotate View tool
You use the Rotate View tool to rotate the canvas non-destructively; it does not transform the image. Rotating the canvas can be useful for any number of reasons, including facilitating easier painting or drawing. (OpenGL is required.)
Use rotate gestures on Macbook Pro and Macbook Air computers with multi-touch trackpads to non-destructively rotate the canvas.
참고 :

Photoshop CS4: Rotate View Tool Overview from George Coghill on Vimeo.

키워드 : annoying compass icon
링크 : Quick way to reset rotate view in Photoshop CS4?

Wednesday, December 7, 2011

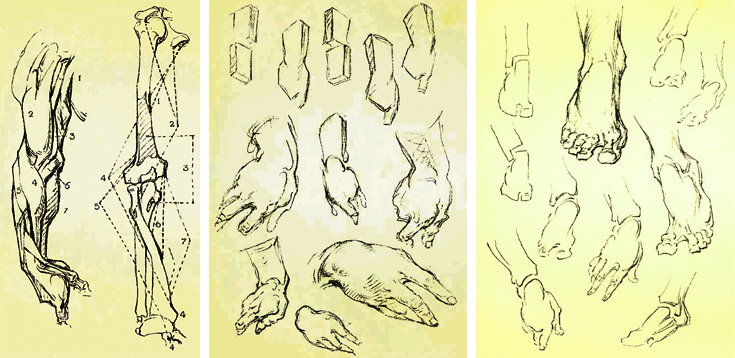
인체 해부학 공부하기 좋은 자료 Best 4

미술에 필요한 Anatomy 공부하기 좋은 자료 Best 4

1. Glenn Vilppu - Drawing Anatomy Lecture Series (DVD)


2. Burne Hogarth - Dynamic Anatomy (Book)


3. George Bridgman - Constructive Anatomy (Book)


4. Gnomon - David Finch - Dynamic Figure Drawing (DVD)

Straight Lines in ArtRage 3

질문 : How do I draw straight lines?
답 : Hold down the CTRL key (or Command key in Macs) to draw a straight line.
Holding down the SHIFT key will allow you to rotate the direction you draw in, in 15 degree steps.
(holding down SHIFT alone changes the size of the tool, with the pen movement - up to increase size, down to decrease)
출처 : http://www.squidoo.com/artrage-3-tutorials

Monday, December 5, 2011

[네이버캐스트] 오늘의 미술 > 모네

[네이버캐스트] 오늘의 미술 > 모네
모네에게 물체가 본래 가지고 있는 것으로 여겨졌던 고유색이라는 것은 기억과 관습이 만든 편견, 곧 '뇌'의 산물일 뿐이었다.

Saturday, December 3, 2011

Close-Up on Hollywood's Creature Teacher

Close-Up on Hollywood's Creature Teacher
By: Diane MehtaJuly 1, 2009
Alvarez, founder of the Gnomon School of Visual Effects, in Hollywood..

Tuesday, November 29, 2011

ArtRage hotkeys (All)

참고 : ArtRage hotkeys (Important)

1 File & Reference Image


2 Layer


3 Tool


4 Canvas & Edit


5 Panel


6 Color


7 Tracing & Stencil


8 Selection & Filter


9 Cursor

ArtRage hotkeys (Important)

참조 링크 : ArtRage Hotkeys (All)

Tools
Pencil : P
Watercolor : W
Paint Tube : B
Oil Brush : O
Palette Knife : K
Eraser : E
Crayon : C
Chalk : L
Sticker Spray : S
Ink pen : I
Felt Pen : M
Airbrush : A

Transform/Select
Transform tool : Shift + T
Select tool : Shift + S

Tool/Brush size
Tool Size ± 1% : (←/→)
Tool Size ± 10% : Shift + (←/→)
Tool Pressure ± 1% : (↑/↓)
Tool Pressure ± 10% : Shift + (↑/↓)
Resize brush : Shift + drag LMB

Zoom
Zoom Canvas : Command + "+" / Command + "-"

Canvas
Canvas Rotation : Alt + RMB
Canvas Rotation reset : Alt + D
Canvas Zoom : Shift + drag RMB
Canvas Zoom to 100% : Shift + D
Canvas Panning : drag RMB (포토샵의 space 키와 같은 역할)
Canvas lighting toggle : F5

Reference Image / Tracing
Load Reference Image : Command + R
Load Tracing Image : Command + T
Clear Tracing Image : Command + Shift + T
Show Tracing Image : /

Color
Pick Color : Alt + LMB

레퍼런스 : andrea_bianco-speed_painting_with_artrage-feb2010.pdf
키워드 : Shortcuts
미러 : ArtRage 3.5 Hotkeys.png, ArtRage 3.5 Hotkeys org.png

Monday, November 28, 2011

ArtRage 소개

Painter 대용으로 쓰기 좋으면서 매우 가벼운 프로그램
사용법 익히기가 대단히 쉬움

소프트웨어 소개 :
ArtRage is an easy to use, stylish painting package for Windows, Mac OS X, and iPad.
공식 홈페이지
공식 홈페이지 > 데모버전 다운로드
위키피디아 > ArtRage

튜토리얼 :
Artrage Tutorials

PaintTool SAI

Paint Tool SAI in English
Paint tool SAI Tutorial (FAST and BASIC for beginners)

인용 :
PaintTool SAI is a lightweight software focused solely on painting and drawing. Because of that, it doesn't include some of the common features that similar software has, such as text layers, gradients and shape tools, and therefore the finalizing touch of drawings is to be made in another program. This is helped by SAI's ability to export the files to other popular formats, like .psd or .bmp, in addition to its .sai-format.

Various raster drawing tools are implemented, such as the Airbrush, Watercolor, Pen and Marker, which can all be easily customized, and stored in slots in the user interface of the application. There is also a set of vector drawing tools intended for inking, which, like the raster tools, can be configured to be pen pressure sensitive. However, the vector tools are not affected by selections, and therefore need to be adjusted by other vector tools.

출처 : trial version 다운로드 링크

simple 2d animation software

Flipbook
→ 디즈니 애니메이터 Eric Goldberg('알라딘' 등 애니메이션 제작)가 추천한 프로그램
→ 3D 애니메이션 만들 때도 함께 사용하면 좋다고 함
Toon Boom Studio

Monday, November 14, 2011

제임스 카메론의 영화인생과 작품세계

제임스 카메론의 영화인생과 작품세계 2
재정적 곤란을 겪고 있던 짐은 부업으로 (극장 개봉 없이 곧장 비디오로 출시되는) 싸구려 영화 비디오테이프의 포스터를 그려주는 일을 맡기도 했다. (짐의 그림 그리는 재주는 결국 어떤 방식으로든 그에게 결정적 도움을 주었던 것이다!)
...
아놀드에게는 짐이 그린 그림 한 장이 배달됐다. 그림에는 아래와 같은 이미지가 그려져 있었다...
이 그림을 본 아놀드는 곧장 자신의 에이전트에게 전화를 걸어 터미네이터 역을 맡겠다고 소리쳤다. 그리고 그날 오후, 아놀드의 캐스팅 계약은 정식으로 체결됐다.
키워드 : 터미네이터

Sunday, October 16, 2011

Ableton

Ableton Live
M83, Sasha, Daft Punk 등의 아티스트들이 사용하는 Loop based software

M83
http://ilovem83.com/2011/09/13/musician-required-for-m83-tour/
An opportunity has arisen for a suitable musician to join the forthcoming M83 World Tour which commences in Mexico in October. We are looking for a multi-instrumentalist based in the Los Angeles area who can play Guitar, Bass and Keyboards. They should also be able to sing and ideally have previous knowledge of working with Ableton.

Sasha
http://en.wikipedia.org/wiki/Ableton_Live
Sasha performing using Ableton Live.

Ableton Live 를 사용하는 아티스트들 목록
http://en.wikipedia.org/wiki/Category:Ableton_Live_users

Tuesday, September 20, 2011

Photoshop 에서 action 에 대한 user defined shortcut 만들기

질문 : 일반적인 user defined shortcut 은 Edit > Keyboard Shortcuts 에서 해주면 되는데, User가 만든 action에 대한 핫키를 지정하는 것은 여기서 안되는 듯 하다. 어떻게 하면 좋은가?
답 :
  1. Actions 윈도우 띄움 (Window > Actions 하면 뜸)
  2. 거기서 hotkey를 지정하고 싶은 액션을 선택
  3. Actions 윈도우의 오른쪽 위의 버튼을 누르면 메뉴가 보임
  4. Action Options... 를 실행
  5. 다이얼로그 박스에 보면 Functions Key 라는 항목이 있는데
  6. 거기서 F1, F2, F3... 같은 키를 쇼트컷으로 지정할 수 있게 돼 있음
보충 : 폰트 변경을 Action 으로 만들 경우, 텍스트 박스 내부의 텍스트를 선택한 채로 action 을 실행해도 잘 되던 것이 핫키를 쓰면 안되는 경우가 있다. 이럴 때는 텍스트가 아니라 텍스트 박스 자체(레이어)가 선택된 채로 핫키를 쓰면 잘 된다.

Monday, June 6, 2011

Maya 에서 여러 레이어 한꺼번에 지우기

질문 : Multiple Layers 를 한번에 지우는 법?
답 : Layers menu > Layers > Delete Selected Layers
레퍼런스 : Maya - Deleting Multiple Layers

Sunday, June 5, 2011

Maya 에서 Border Edge 다루는 법

Polygon 모델을 부분별로 이어 붙여 모델링하면 model 안쪽에 border edge 가 그대로
남는 경우가 있다. 이런 경우 Vertex 를 merge 하더라도 border edge 가 사라지지는 않는다.

1. Border Edge 보는 법
Display > Polygons > Border Edges

2. Border Edge 붙이는 법
붙일 Border Edge 를 선택(하나의 엣지처럼 보이지만 더블클릭하면 두개 선택된걸로 표시됨)한 후
Shift + Right click 해서 메뉴 꺼내고
Merge/Collapse Edges > Merge Border Edges 하면 된다

3. 그래도 안붙는 경우
(1) Merge Border Edges Option 창을 꺼낸 후
(2) Object Mode 에서 물체를 선택하고
(3) Merge Border Edges 를 Apply 하면
object 의 모든 불필요한 border edge 가 다 사라진다.

4. 이렇게 해도 안붙는 경우?
이런 경우, border edge 를 경계로 normal 이 뒤집혀 있을 것이다
노말의 방향을 일치시켜준다. Normal > Conform 을 쓰면 편함.

Wednesday, June 1, 2011

Select Isolate 의 핫키

질문 : Show > Isolate Select > View Selected 의 핫키는?
답 : 정확히 이 Panel Menu 의 check box 를 켜고 끄는건 아니지만
object를 선택하고 Shift + I 를 하면 그 물체만 보이고
아무것도 선택하지 않은 상태로 Shift + I 를 하면 모든 물체가 보이게 된다.

Maya Hotkey Editor 에서 Select Isolate 가 위치한 곳은?

질문 : Maya Hotkey Editor 에서 Select Isolate 가 위치한 곳은?
답 : Miscellaneous 항목에 있다.
참고 : default 핫키는 Shift + I 이다.

Maya Default Hotkeys (All)

No Modifiers
a : SelectAllMarkingMenu
b : ModifyUpperRadiusPress
c : SnapToCurve
d : EnterEditMode
e : RotateToolWithSnapMarkingMenu
f : FrameSelected
g : RepeatLast
h : UIModeMarkingMenu
i : InsertKeyToolActivate
j : MoveRotateScaleToolToggleSnapMode
k : TimeDraggerToolActivate
l : LockCurveLength
m : ModifyDisplacementPress
n : ModifyPaintValuePress
o : PolyBrushMarkingMenu
p : Parent
q : SelectToolOptionsMarkingMenu
r : ScaleToolWithSnapMarkingMenu
s : SetKey
t : ShowManipulators
u : PaintOperationMarkingMenuPress
v : SnapToPoint
w : TranslateToolWithSnapMarkingMenu
x : SnapToGrid
y : NonSacredTool
z : Undo
A : FrameAllInAllViews
B : ModifyLowerRadiusPress
C : SnapToCurve
D : DuplicateWithTransform
E : SetKeyRotate
F : FrameSelectedInAllViews
G : RepeatLastActionAtMousePosition
H : ShowSelectedObjects
I : SelectIsolate
J : MoveRotateScaleToolToggleSnapRelativeMode
M : TogglePanelMenubar
P : Unparent
Q : SelectComponentToolMarkingMenu
R : SetKeyScale
S : KeyframeTangentMarkingMenu
T : AssignNewMaterial
U : ModifyUVVectorPress
V : SnapToPoint
W : SetKeyTranslate
X : SnapToGrid
Z : Redo
0 : DefaultQualityDisplay
1 : LowQualityDisplay
2 : MediumQualityDisplay
3 : HighQualityDisplay
4 : DisplayWireframe
5 : DisplayShaded
6 : DisplayShadedAndTextured
7 : DisplayLight
8 : PaintEffectsPanel
F1 : Help
F2 : ShowAnimationUI
F3 : ShowPolygonsUI
F4 : ShowModelingUI
F5 : ShowDynamicsUI
F6 : ShowRenderingUI
F8 : SelectToggleMode
F9 : SelectVertexMask
F10 : SelectEdgeMask
F11 : SelectFacetMask
F12 : SelectUVMask
` : STRSTweakModeOn
- : DecreaseManipulatorSize
= : IncreaseManipulatorSize
[ : GoToPreviousView
] : GoToNextView
\ : TogglePanZoomPress
' : SelectCluster_in_Jasper
, : PreviousKey
. : NextKey
/ : PickColorActivate
~ : SmoothingDisplayShowBoth
+ : IncreaseManipulatorSize
{ : PreviousViewArrangement
} : NextViewArrangement
< : ShrinkPolygonSelectionRegion > : GrowPolygonSelectionRegion
Up : PickWalkUp
Down : PickWalkDown
Left : PickWalkLeft
Right : PickWalkRight
Page_Up : SmoothingLevelIncrease
Page_Down : SmoothingLevelDecrease
Home : EnterEditMode
Return : CompleteCurrentTool
Space : ShowHotbox

Control
control a : ShowAttributeEditorOrChannelBox
control b : TemplateBrushSettings
control c : CopySelected
control d : Duplicate
control f : SetFullBodyIKKeys
control g : Group
control h : HideSelectedObjects
control i : SelectNextIntermediatObject
control n : NewScene
control o : OpenScene
control q : Quit
control r : CreateReference
control s : SaveScene
control t : UniversalManip
control v : PasteSelected
control w : SoftModTool
control x : CutSelected
control z : Undo
control D : DuplicateSpecial
control H : ShowLastHidden
control M : ToggleModelEditorBars
control F9 : ConvertSelectionToVertices
control F10 : ConvertSelectionToEdges
control F11 : ConvertSelectionToFaces
control F12 : ConvertSelectionToUVs
control ` : SmoothingDisplayToggle
control , : PrevSkinPaintMode
control . : NextSkinPaintMode
control ~ : SmoothProxy
control Up : CoarserSubdivLevel
control Down : CreateSubdivRegion
control Left : RenderViewNextImage
control Right : RenderViewPrevImage
control Page_Up : PickWalkIn
control Page_Down : PickWalkOut
control Space : ToggleUIElements

Alt(Option)
option a : ToggleWireframeInArtisan
option b : CycleBackgroundColor
option c : ToggleColorFeedback
option d : SetFullBodyIKKeysAll
option e : ToggleFBIKEffectorsRotatePinState
option f : FloodSurfaces
option g : HypergraphIncreaseDepth
option h : HideUnselectedObjects
option j : ToggleMultiColorFeedback
option m : FullHotboxDisplay
option q : SelectPolygonToolMarkingMenu
option r : ToggleReflection
option s : ToggleFBIKEffectorsPinState
option t : HypergraphDecreaseDepth
option v : PlaybackToggle
option w : ToggleFBIKEffectorsTranslatePinState
option x : SetFullBodyIKKeysBodyPart
option A : DecrementFluidCenter
option D : DeleteHistory
option S : IncrementFluidCenter
option V : GoToMinFrame
option 1 : FBIKReachKeyingOptionFK
option 2 : FBIKReachKeyingOptionSimple
option 3 : FBIKReachKeyingOptionIK
option 4 : SetFullBodyIKKeysSelected
option 5 : ToggleFkSkeletonVisibility
option F9 : SelectVertexFaceMask
option ` : CreateSubdivSurface
option , : PreviousFrame
option . : NextFrame
option ~ : CreateSubdivSurfaceOptions
option Up : PixelMoveUp
option Down : PixelMoveDown
option Left : PixelMoveLeft
option Right : PixelMoveRight

Command
command c : CopySelected
command d : Duplicate
command g : Group
command i : Import
command n : NewScene
command o : OpenScene
command r : CreateReference
command s : SaveScene
command v : PasteSelected
command w : CloseFrontWindow
command x : CutSelected
command y : RepeatLast
command z : Undo
command D : DuplicateSpecial
command S : SaveSceneAs
command Z : Redo
command ? : Help

List All
a : SelectAllMarkingMenu
control a : ShowAttributeEditorOrChannelBox
option a : ToggleWireframeInArtisan
b : ModifyUpperRadiusPress
control b : TemplateBrushSettings
option b : CycleBackgroundColor
c : SnapToCurve
control c : CopySelected
option c : ToggleColorFeedback
control option c : CopyVertexSkinWeights
d : EnterEditMode
control d : Duplicate
option d : SetFullBodyIKKeysAll
e : RotateToolWithSnapMarkingMenu
option e : ToggleFBIKEffectorsRotatePinState
f : FrameSelected
control f : SetFullBodyIKKeys
option f : FloodSurfaces
g : RepeatLast
control g : Group
option g : HypergraphIncreaseDepth
h : UIModeMarkingMenu
control h : HideSelectedObjects
option h : HideUnselectedObjects
i : InsertKeyToolActivate
control i : SelectNextIntermediatObject
j : MoveRotateScaleToolToggleSnapMode
option j : ToggleMultiColorFeedback
k : TimeDraggerToolActivate
l : LockCurveLength
m : ModifyDisplacementPress
option m : FullHotboxDisplay
n : ModifyPaintValuePress
control n : NewScene
o : PolyBrushMarkingMenu
control o : OpenScene
p : Parent
q : SelectToolOptionsMarkingMenu
control q : Quit
option q : SelectPolygonToolMarkingMenu
control option q : InsertIsoparms
r : ScaleToolWithSnapMarkingMenu
control r : CreateReference
option r : ToggleReflection
s : SetKey
control s : SaveScene
option s : ToggleFBIKEffectorsPinState
t : ShowManipulators
control t : UniversalManip
option t : HypergraphDecreaseDepth
u : PaintOperationMarkingMenuPress
v : SnapToPoint
control v : PasteSelected
option v : PlaybackToggle
control option v : PasteVertexSkinWeights
w : TranslateToolWithSnapMarkingMenu
control w : SoftModTool
option w : ToggleFBIKEffectorsTranslatePinState
x : SnapToGrid
control x : CutSelected
option x : SetFullBodyIKKeysBodyPart
y : NonSacredTool
z : Undo
control z : Undo
A : FrameAllInAllViews
option A : DecrementFluidCenter
B : ModifyLowerRadiusPress
C : SnapToCurve
D : DuplicateWithTransform
control D : DuplicateSpecial
option D : DeleteHistory
E : SetKeyRotate
F : FrameSelectedInAllViews
G : RepeatLastActionAtMousePosition
H : ShowSelectedObjects
control H : ShowLastHidden
I : SelectIsolate
J : MoveRotateScaleToolToggleSnapRelativeMode
M : TogglePanelMenubar
control M : ToggleModelEditorBars
P : Unparent
Q : SelectComponentToolMarkingMenu
R : SetKeyScale
S : KeyframeTangentMarkingMenu
option S : IncrementFluidCenter
T : AssignNewMaterial
U : ModifyUVVectorPress
V : SnapToPoint
option V : GoToMinFrame
W : SetKeyTranslate
X : SnapToGrid
Z : Redo
0 : DefaultQualityDisplay
1 : LowQualityDisplay
option 1 : FBIKReachKeyingOptionFK
2 : MediumQualityDisplay
option 2 : FBIKReachKeyingOptionSimple
3 : HighQualityDisplay
option 3 : FBIKReachKeyingOptionIK
4 : DisplayWireframe
option 4 : SetFullBodyIKKeysSelected
5 : DisplayShaded
option 5 : ToggleFkSkeletonVisibility
6 : DisplayShadedAndTextured
7 : DisplayLight
8 : PaintEffectsPanel
F1 : Help
F2 : ShowAnimationUI
F3 : ShowPolygonsUI
F4 : ShowModelingUI
F5 : ShowDynamicsUI
F6 : ShowRenderingUI
F8 : SelectToggleMode
F9 : SelectVertexMask
control F9 : ConvertSelectionToVertices
option F9 : SelectVertexFaceMask
F10 : SelectEdgeMask
control F10 : ConvertSelectionToEdges
F11 : SelectFacetMask
control F11 : ConvertSelectionToFaces
F12 : SelectUVMask
control F12 : ConvertSelectionToUVs
` : STRSTweakModeOn
control ` : SmoothingDisplayToggle
option ` : CreateSubdivSurface
- : DecreaseManipulatorSize
= : IncreaseManipulatorSize
[ : GoToPreviousView
] : GoToNextView
\ : TogglePanZoomPress
' : SelectCluster_in_Jasper
, : PreviousKey
control , : PrevSkinPaintMode
option , : PreviousFrame
. : NextKey
control . : NextSkinPaintMode
option . : NextFrame
/ : PickColorActivate
~ : SmoothingDisplayShowBoth
control ~ : SmoothProxy
option ~ : CreateSubdivSurfaceOptions
+ : IncreaseManipulatorSize
{ : PreviousViewArrangement
} : NextViewArrangement
< : ShrinkPolygonSelectionRegion > : GrowPolygonSelectionRegion
Up : PickWalkUp
control Up : CoarserSubdivLevel
option Up : PixelMoveUp
Down : PickWalkDown
control Down : CreateSubdivRegion
option Down : PixelMoveDown
Left : PickWalkLeft
control Left : RenderViewNextImage
option Left : PixelMoveLeft
control option Left : PolySpinEdgeBackward
Right : PickWalkRight
control Right : RenderViewPrevImage
option Right : PixelMoveRight
control option Right : PolySpinEdgeForward
Page_Up : SmoothingLevelIncrease
control Page_Up : PickWalkIn
Page_Down : SmoothingLevelDecrease
control Page_Down : PickWalkOut
Home : EnterEditMode
Return : CompleteCurrentTool
Space : ShowHotbox
control Space : ToggleUIElements


키워드 : 전체, Entire List, Shortcut, 핫키
Maya 에서 Hotkey 목록을 모두 보는 법

질문 : Maya 에서 Hotkey 목록을 모두 보는 법
답 : Window > Settings/Preferences > Hotkey Editor 띄운 후
List All... 버튼 누름

NURBS 를 Polygon 으로 convert 하는 법

질문 : NURBS를 본래의 형태에 가장 가깝도록 Polygon 으로 convert 하는 법
답 :

Maya 에서 Edge 를 따라 Split 하는 법?

질문 : Maya 에서 Split Edge 하는 법
답 : Edge 를 선택하고 Mesh > Detach Component 하면 된다.
레퍼런스 : Split Edge

Tuesday, May 31, 2011

NURBS patch modeling

질문 : What is actually the point of NURBS patch modeling?
답 :
넙스 자체로 최종 모델을 만드는 목적보다는 모델링 속도를 빠르게 하기 위해 주로 사용된다.
장점으로는 Surfaces > loft, boundary 등을 써서 폴리곤보다 빠르게 형태를 만들 수 있다.
버텍스들을 당기는 방식으로는 형태가 비뚤어지기 쉬운데 넙스에서는 그것을 방지할 수 있다.
polygon model 에서는 전체의 resolution 변화가 쉽지 않은 반면
넙스에서는 isoparm 추가 등으로 쉽게 전체의 resolution 을 변화시킬 수 있다.
게다가 넙스는 언제든지 폴리곤으로 변환 가능... 기타 등등

NURBS patch modeling 을 폴리곤과 함께 써서 부분부분을 모델링 (예를 들면
손가락 끝은 폴리곤, 손가락은 넙스, 손바닥은 폴리곤, 팔은 넙스로 모델링) 한 후
필요한 곳에 NURBS 의 isoparm 을 추가하거나 지워서 연결되는 부분의
topology 를 일치시킨 후 폴리곤으로 변환하는 방법을 쓰면 매우 빠르게
모델링 가능.

인용 : i believe its embedded in some studios pipeline too deeply. some big studios like dreamworks and ilm still use nurbs i believe. many other studios used it in the beginning and converted later.
레퍼런스 : What is actually the point of NURBS patch modeling?

Monday, May 30, 2011

Maya 에서 NURBS 의 CV 를 항상 보이게 하는 법

질문 : Maya 에서 NURBS 의 CV 를 항상 보이게 하는 법
답 : 물체를 선택한 후 Display > NURBS > CVs 를 켜면 된다

Maya의 Muscle creator 로 만든 muscle 을 나중에 edit 하는 법

질문 : Muscle creator 로 만든 muscle 을 나중에 edit 하는 법?
답 : 근육을 선택하고 Muscle > Muscles/Bones > Muscle Creator 실행하면
Edit 탭에서 조절할 수 있음

Practical Experiences with Pose Space Deformation

인용 :
It takes time to apply PSD successfully, especially when
applied to complex characters.
For BOLT, it took approximately three weeks to apply PSD
onto a major character.
Therefore, numerous tools were
developed to streamline the application of PSD to additional
characters. These include tools to mirror or transfer targets,
and those to replicate PSD with new drivers and drivens.
When one character was complete, scripts simply used these
tools to map deformations from one character to the next.
레퍼런스 : Practical Experiences with Pose Space Deformation
키워드 : 영화 Bolt 에 적용한 사례, feature film, muscle, avatar

Maya 의 Muscle Creator 로 생성한 근육이 너무 흔들리는데 덜 흔들리게 하는 방법은?

질문 : Maya 의 Muscle Creator 로 생성한 muscle 의 jiggle 을 적게 하는 방법?
답 : jiggle 값은 Muscle Creator 로 생성한 muscle 의 바깥쪽에 보이는 cube 들의 attribute 데 들어있다. 모든 cube 에 대해 이걸 0 으로 해주면 jiggle 현상이 완전히 없어진다.
참고 : Muscle Creator 사용법을 제대로 배울 수 있는 레퍼런스는 다음 help 항목이 거의 유일하다
레퍼런스 : User Guide > Rigging > Maya Muscle > Maya Muscle Advanced Techniques > Rigging muscles

Sunday, May 29, 2011

작업속도 향상을 위한 Maya hotkey 및 메뉴 모음

Set key for Rotate : Shift + E
(update 예정)
키워드 : shortcut, menu

Saturday, May 28, 2011

Maya에서 selection set 쓰는 법

질문 : Maya에서 selection set 쓰는 법
답 : Quick Selection Set 을 쓰면 된다.
Create > Sets > Quick Selection Set ... 으로 생성하고
Edit > Quick Selection Sets 에서 선택하면 됨
참고 : MEL 로 하는 방법도 있다.
Creating a Quick Selection Set with MEL
인용 :
"Quick Select Sets" are just sets with the text "gCharacterSet" attached to them.
So just do something like this to get it to show up in that menu:
sets -name "MyQSS" -text "gCharacterSet";

joint 의 rotate pivot 수정하는 법

질문 : joint 의 rotate pivot 수정하는 법
답 : Component 모드에서 ? 아이콘 누르면 조인트의 xyz 축이 보이는데 그걸 선택하면 rotate manipulator 가 뜸
인용 : hmmm... I believe that what you want to do is to adjust your rotate axis? Go into component selection mode (i.e hit F8), press the ? icon on your selection menu bar and activate your rotate axes. Then spin them in your desired direction and exit component selection mode.
출처 : Can you rotate pivot in maya?

How to Display overlapping UVs

질문 : How to Display overlapping UVs
답 :
In the UV Texture Editor menu, select Image > Shade UVs > option
Click the Shade UVs icon located on the toolbar of the UV Texture Editor.
출처 :
User Guide > Modeling > Mapping UVs > Editing UVs > Display overlapping UVs
키워드 : Maya

Friday, May 27, 2011

버텍스를 split 하는 법

질문 : 버텍스를 split 하는 법?
답 : 버텍스를 선택한 후 Shift + Right Mouse Button > Split Vertex 하면 된다
참고 : Shift + Right Mouse Button 메뉴를 잘 쓰면 작업속도가 많이 향상됨
(예를 들면 Merge Vertices 나 Extrude 등을 이 context menu 로 작업하면 좋음)
레퍼런스 : split vertex gone?

hard edge 해결법

질문 : vertex 를 merge 해서 두 물체를 붙였는데 연결부위의 edge 만 hard 해 보일 경우 해결법?
답 : hard 한 엣지를 선택한 후 Normals > Soften Edge 하면 된다.
레퍼런스 : Digital Tutors - Re-Attaching a Head with Blendshapes to Its Body

Maya 에서 isoparm 을 curve 로 만들려면

질문 : Maya 에서 isoparm 을 curve 로 만들려면?
답 : Edit Curves > Duplicate Surface Curves
레퍼런스 : isoparms to curves
키워드 : Nurbs

Thursday, May 26, 2011

ZBrush 에서 object merge 하는 법

질문 : 지브러시에서 오브젝트를 merge 하는 법?
답 : Tool -> Geometry -> Insert Mesh

Tuesday, May 24, 2011

ZBrush 에서 subtool 을 viewport 에서 클릭해서 선택하는 법?

질문 : subtool palette 에서 선택하는게 아니라 뷰포트에서 보면서 선택하는 방법은 없는가?
답 : Alt click 하면 됨
레퍼런스 : Quick-select subtool?

Saturday, May 21, 2011

지브러시에서 여러 object 를 merge 하려면

질문 : ZBrush 에서 여러 object 를 merge 하려면
답 : Tool -> Geometry -> Insert Mesh
레퍼런스 : Topology-Workflow - Merging Objects (by Rastaman)

Friday, May 20, 2011

Retopology 핫키 등

요약 :
To add a point: click on desired spot.
To delete a point: ALT-click on point.
To set a new starting point: CTRL-click on point.
To select a point: LMB-click on the point.
To deselect a point: LMB-click outside your model.
To move points: go from Draw mode to Move mode.
To move more points together: increase the draw size.
To scale points: go to Scale mode. (works best with larger draw size)
To delete a connection-line without deleting the connected points: insert a new point in the middle of the line and delete that point.
레퍼런스 : Topology and Reflow Lab
Topology: Mesh Editing
키워드 : shortcuts, mouse, alt

ZBrush 에서 retopology 할때 backface culling 안되는 문제 해결법

질문 : ZBrush 에서 retopology 할때 backface culling 이 안돼서 뒷면이 다 보여 불편한데 방법은 없는가?
답 : 다음과 같이 하면 말끔히 해결됨
it's actually pretty simple.
and doesn't require you to move anything around in your settings.
  1. 토폴로지 작업하려는 툴(모델) 선택 ... Select the tool you want to retopo
  2. 지스피어를 서브툴로 추가 ... tool>subtool>append>zSphere
  3. 서브툴에서 지스피어 선택 ... select the append zSphere
  4. Edit Topology 버튼 누름 ... tool>topology>edit topology
  5. 그러면 뒷면 보이는 문제 없이 작업 가능 ... work as you normally would.
위에서 1과 2는 바뀌어도 된다.
즉 지스피어를 툴로 먼저 선택하고 토폴로지 작업하려는 툴(모델)을 서브툴로 추가해도 잘 된다.
If your zSphere starts too big...scale it down so it is inside of your mesh somewhere.
지스피어가 너무 크면 방해될 것이므로 작게 해서 안보이게 하면 된다고 했는데, scale 을 바꾸거나 position 을 바꾸거나 하면 retopology 가 안됨.
왜 그런지는 불분명.
참고 :
다만, Adaptive Skin 을 프리뷰하려면 subtool list 에서 mesh 를 hide 해야 하는 불편이 있다.
(기존에 backface culling 이 안되는 불편과 비교할 바는 아니지만)
그런데 backface culling 문제는 지브러시 나중 버전에서 수정될 가능성도 높다.
출처 : Backface Culling during Retop?
키워드 : Retopology, transparent, 투명

Thursday, May 19, 2011

ZBrush 에서 뷰포트 크기를 크게 하는 법

질문 : ZBrush 에서 viewport 가장자리가 불투명해서 답답한데 뷰포트 크기를 크게 하는 법?
답 : Document > New Document 할때 자동으로 최대 사이즈가 되도록 옆의 WSize 를 체크해둔다. 본래 2.5D 캔버스 크기를 조절해주는 옵션이지만 Tool 작업 할때는 그냥 큰 뷰포트를 쓴다는 정도의 의미밖에는 없음
설명 : + / - / 0 키로 확대/축소/100% 할 수도 있지만 그렇게 하면 확대했을때 pixel 이 깨져보인다
키워드 : plug-in, UI, 인터페이스, 투명, margin

ZSphere 로 모델링 시 magnet 을 써도 그냥 지스피어와 다르지 않은데 그 이유는

질문 : ZSphere 로 모델링 시 magnet 을 써도 똑같은데 왜그런가?
답 :
Magnet 은 새로운 스키닝 방식에서 쓸 수 없다
tool>adaptiveSkin>classic skinning 를 해야 마그넷을 쓸 수 있다
인용 :
mag/grav spheres don't work with the new skinning method.
you can go back to the old method though
tool>adaptiveSkin>classic skinning.
레퍼런스 :
Reload this Page Magnetic Zsphere probs on zbrush4

지브러시에서 쓰기 좋은 Tablet 설정

버튼은 아래쪽 위쪽 둘다 right click 으로 해두면 좋다
키워드 : 태블릿

지브러시에서 Adaptive Skin 을 edit 할 수 있는가

질문 : 지브러시에서 Adaptive Skin 을 edit 할 수 있는가
답 : ZSphere 의 Adaptive Skin 은
Make Adaptive Skin 을 하기 전에는 sculpt 할 수 없다
(Make Adaptive Skin 안하고 Sculpt 하면 얼핏 되는 것 같지만
Density 를 변화시키거나 하면 금방 없어진다)

Wednesday, May 18, 2011

ZBrush 에서 인터페이스가 의도치 못하게 바뀌었을 때 해결법

질문 : ZBrush 에서 인터페이스가 의도치 못하게 바뀌었을 때 해결법
답 : Preferences > Config > Restore Custom UI 하면 된다

Sunday, May 15, 2011

Maya에서 애니메이션시 gimbal lock 방지하는 방법

질문 : Maya에서 애니메이션시 gimbal lock 방지하려면?
답 : Quaternion Interpolation 을 쓰면 된다.
설명 :
Graph Editor menu bar 에서 Curves > Change Rotation Interp 로 가서
Quaternion Slerp 을 선택해본다.
gimbal lock 과 이상한 interpolation 문제가 한꺼번에 해결된다.
실험 :
quaternion interpolation 과 기존의 Euler interpolation 을 실험해보기 위해 다음과 같이 해보자.
xyz rotation 을 각각
frame 1 : 0 0 0
frame 8 : -90 -90 90
frame 15 : 0 -90 0
으로 주고 key 한다.
frame 8 과 frame 15 는 실제로 같은 orientation 이다.
기존의 Euler Interpolation 을 쓰면 8 프레임에서 15 프레임으로 갈때 이상한 경로로
휘어지는 기묘한 움직임을 보이는 반면 Quaternion Slerp 를 쓰면 가장 가까운 경로로
interpolation 됨을 알 수 있다. Quaternion Cubic 이나 Quaternion Tangent Independent 는
좀 이상한 interpolation 을 보인다.
결론적으로 애니메이션에는 Quaternion Slerp 이 가장 좋다.
레퍼런스 :
User Guide > Animation > Animation > Animation Windows and Editors > Graph Editor >
User Guide > Animation > Animation > Keyframe Animation > Keyframe animation and the Graph Editor
Slerp (wiki)
Slerp (absoluteastronomy.com)

Friday, May 13, 2011

LBrush 사용시 폴리곤 topology 보는 방법

질문 : LBrush 사용시 폴리곤 topology 가 안보이는데 어떻게 해야 보이나?
sculpt 를 할 때 폴리곤을 볼 수가 없어서 폴리곤이 비뚤비뚤해져도 고칠 수가 없다
답 : LBrush Tool 윈도우의 Display Property 에서 맨 위의 Shaders 체크박스를 끈다.
그리고 그 밑의 Mode 에서 Smooth Shaded + Isolines 또는
Smooth Shaded + Isolines + Polygons 를 해보면 토폴로지가
제대로 보일 것이다.

Thursday, May 12, 2011

마야에서 모델의 face 가 안보일 경우

질문 : 어쩌다보니 마야의 model 에서 face 가 안보이는데 어떻게 하면 되나?
(select 해보면 face 는 존재하지만 6 키를 눌러도 보이지를 않음)
답 : 어쩌다가 material 과의 연결이 사라진 경우 이렇게 되는데
lambert1 shader 를 다시 assign 해주면 해결된다
레퍼런스 : Invisible faces in my mesh

마야에서 모델 반쪽을 modeling 할때 가운데 자른 부분의 vertex 를 x=0 로 맞춰주기

질문 : 마야에서 모델을 반으로 잘라 모델링할때 가운데 자른 부분의 vertex 가 x=0 에서 벗어난 경우 어떻게 정확히 x=0 으로 만들어주나?
답 : 버텍스들을 선택한 후
move -x 0 ;
를 실행하면 끝. 이건 Shelf 에 올려놓고 쓰면 좋다.
설명 : 다음과 같이 실행해도 된다.
move -moveX -absolute 0;
move -x -absolute 0;
출처 : set vertices to absolute translateX=0?
키워드 : symmetry, symmetrical, cut in half, MEL
참고 : 마야에서 Symmetry 유지하면서 모델링하기 위해 Mirror Instance 하는 법

마야에서 캐릭터 모델링시 Bone 을 심어서 변형하는 방식

  1. 캐릭터 모델에 bone 을 bind 해서 포즈 잡은 후
  2. 포즈를 잡은 모델을 duplicate 하고 (이 duplicate 한 메쉬가 새로운 캐릭터 모델이 된다)
  3. 새로운 모델의 attribute 를 unlock 해준다
키워드 : character modeling

마야에서 Symmetry 유지하면서 모델링하기 위해 Mirror Instance 하는 법

질문 : Maya 에서 대칭으로 modeling 하기 위해 mirror instance 하는 법
답 : Edit > Duplicate Special
Reset 하고 Copy Instance 로 하고 Scale 은 -x 로 하도록 두가지만 고쳐줌.
참고 : Lightwave 나 Modo 에서는 좌우대칭으로 에디팅 가능하지만
Maya 에서는 그것이 안되므로 양쪽을 보면서 작업하기 위해서는
반을 잘라서 반쪽만 남긴 후 mirror instance 를 해야 한다.
키워드 : symmetric modeling

Wednesday, May 11, 2011

LipService/LBrush Tutorials

튜토리얼 : LBrush 로 Pose Space Deformation (PSD) 해주는 방법 - Rigging Video 1
링크 : LipService w/LBrush for Maya BETA Features
참고 링크 : 구부러지는 관절을 제대로 표현하는 방법
키워드 : Joe Alter

ZBrush 에서 Maya 로 모델을 export 할때 사이즈 일치시키는 법

질문 : ZBrush 에서 Maya 로 모델을 obj 로 export 할때 사이즈 일치시키는 법
답 : Tool > Export 옵션에 보면 Scale 파라메터가 있는데 이것을 1 로 만들어주면 된다
참고 : 지브러시에서 drag 해서 툴을 그려주는 것은 사이즈에 영향을 미치지 않는다
즉 크게 그리건 작게 그리건 그것은 캔버스 상의 사이즈일 뿐, tool 의 사이즈는 아니라는 얘기.
레퍼런스 : model size change when you export and import to maya from zbrush?

구부러지는 관절을 제대로 표현하는 방법

질문 : Feature Film 에서 겨드랑이, 사타구니, 무릎 등의 접히는 부분을 찌그러지지 않도록 하기 위해 사용하는 방법?
요약 : 오늘날의 영화제작에서는 Pose Space Deformation을 Muscle System 과 함께 사용한다.
Muscle System 은 Maya 에 이미 있으므로 여기서는 PSD(Pose Space Deformation)만 설명.

설명 :
PSD 는 2000년에 J.P. Lewis 의 SIGGRAPH 논문으로 처음 알려진 방법으로,
관절의 각도에 따른 형태를 모델러가 잡아주어, 관절을 어느 방향으로 구부려도
찌그러지거나 깨지지 않도록 만드는 방식이다. 이는 애니매트릭스 제작에서 여자 캐릭터의
타이트하게 달라붙는 옷 등을 표현하는데 쓰이기도 했다.

그런데 PSD 는 아직 Maya 등의 상용 툴에 기본으로 제공되고 있지 않다.
ILM, Weta, Dreamworks, Pixar 등에서는 feature film 제작시 내부적으로 툴을 만들어
Pose Space Deformation (PSD) 를 사용한다. 이러한 툴 제작은 Technical Director 의 역할이다.

Maya Help 를 보면 조인트 부위에 influence objects 를 넣어서 해결하라고 하는데
이것만 쓰기에는 불편하고 feature film 제작에는 부적합하다.
따라서 Helper Joint 나 influence object 는 Muscle 과 PSD 에 보조적으로 함께 쓰곤 한다.

필요한 툴 :
Corrective Shapes를 구현한 스크립트나 플러그인이 필요하다.
플러그인은 마야 버전이 올라가면 지원이 종종 중단되는 단점이 있음
JoeAlter 의 LipService/LBrush (상용 툴)
Michael Comet 의 poseDeformer (마야 플러그인)
cvShapeInverter (Corrective Shapes 구현한 Python script)
poseReader (Corrective Shapes 구현. 원래 플러그인인데 Python script 버전 있음)

설명 :
poseDeformer 는 오픈소스라 소스코드가 공개되어 있는데
제작자 본인은 컴파일된 버전 공급을 중단한 상태이다.
현재 다른 사람들이 소스코드를 컴파일하여 배포하고 있어서
마야 2011까지는 쓸수가 있지만 이후로도 계속 쓸수 있을지는 불투명한 상태.

Joe Alter 의 LipService/LBrush 는 PSD 를 구현한 상용 툴인데 상당히 기능이 탁월하다.
포즈 별로 형태를 sculpt 해줄 수 있을 뿐 아니라
애니메이션이 완료된 후 형태를 sculpt 해서 수정해줄 수도 있다.
(현재 베타 버전이라 무료 배포중)

PSD 는 업계에서 많이 쓰이는 기술이라 앞으로 상용 패키지에 기본으로 들어갈 지도 모르지만
그때까지는 이들 플러그인이 PSD 를 쓰는 유일한 방법일 것이다. 하지만
Joe Alter 의 LipService/LBrush 는 sculpt 기능이 완전하지 않아 실용적으로 쓰기에 무리가 있음

참고 : Weta 에서 Avatar 를 제작할때 쓴 방법은
  1. Muscle system 을 만든 후 포즈를 잡은 후
  2. 각 포즈에 대해 Pose Space Deformation 을 만들고
  3. 그 후 Muscle system 을 버리고 Pose Space Deformation 만을 사용한 것이다
Muscle system 은 느린데다 형태를 컨트롤하기 어렵기 때문에 이런 방법을 쓰면
muscle 의 장점을 살리면서도 artist 의 의도대로 형태를 컨트롤할수 있다.

레퍼런스 :
Joe Alter’s LipService Pose Space Deformer Coming to Maya
LipService w/LBrush for Maya BETA
poseDeformer

키워드 : bent, bend, joints, volume preservation, in-house tool, Smooth bind, knee, elbow, crotch, armpit, James Cameron, Avatar

poseDeformer

설명 : poseDeformer 는 Pose Space Deformations (PSD) 를 구현한 마야 플러그인이다.
자세한건 다음 링크 참조.
영화의 3D 그래픽스에서 구부러지는 관절을 제대로 표현하는 일반적인 방법

다운로드 :
another poseDeformer for maya OSX build
-> 여기서 poseDeformer for Maya here 링크에서 다운로드하면 됨

다운로드 (기타) :
poseDeformer various compiles
poseDeformer for maya 2011-x64 (win)

사용법 : http://www.tokeru.com/t/bin/view/Maya/MayaPoseDeformer
제작자 링크 : http://www.comet-cartoons.com/maya.html
-> Michael Comet 홈페이지 (poseDeformer 제작자)

키워드 : Pose Space Deformation, Rigging, Skinning, PSD, Maya plug-in, compile

Maya 의 user preferences folder 위치

질문 : Maya 의 user preferences folder는 어디에?
답 : 다음과 같은 위치에 있다
윈도우 : user's directory/My Documents/maya/버전
맥 : /Users/USERNAME/Library/Preferences/Autodesk/maya/2010/
키워드 : maya preferences folder mac directory script path
링크 : mac os x 에서 maya 의 script path

Tuesday, May 10, 2011

Maya 내에 GoZ shelf button 만드는 법

질문 : Maya 내에 GoZ shelf icon 이 없는데 만드는 법은?
답 :
다음 명령을 shelf 에 올리면 된다
string $command = "source \"C:/Users/Public/Pixologic/GoZApps/Maya/GoZbrushFromMaya.mel\" ;" ;
eval $command ;
맥 os x 의 경우 다음과 같은 위치에 있다
/Users/Shared/Pixologic/GoZApps/Maya/GoZBrushFromMaya.mel
출처 : GoZ and Maya 2011

Sunday, May 8, 2011

포토샵에서 brush hardness/softness 변경하는 shortcut

그냥 [ ] 를 하면 브러시의 size 가 변하는데
Shift + [ ] 를 하면 브러시의 hardness/softness 가 변한다
키워드 : 핫키

Saturday, May 7, 2011

Maya 에서 텍스처를 선명하게 렌더하려면

텍스처를 사용할때 항상 주의해야 할 것은 텍스처 파일 로딩 후 필터값을 낮춰주어야
렌더될 때 texture가 선명하게 보인다는 점이다.
필터값이 크면 텍스처의 해상도는 충분히 주었는데 렌더되면 선명하지 못하게 보일 수 있다.
File 노드의 Effects 항목에서 Filter 값이 기본값으로 1.0 이 들어가 있는데
이렇게 하면 blur 가 되어 선명치 못하게 보이게 된다. 이 값을 0.1 정도로 낮춰주도록 하자.
(그렇다고 이걸 0 으로 낮춰버리면 렌더할때 artifact 가 보이게 되어버리므로 주의)
출처 : Gnomon Workshop - Creating Believable Eyes

뷰포트에서 3 키를 눌러서 smooth mesh 로 보여주었는데 그것을 렌더하는 방법은

질문 : 뷰포트에서 3 키를 눌러서 smooth mesh 로 보여주었는데 렌더하면 부드러운 형태가 안나온다
답 : 3 키를 누르는건 뷰포트에서만 효과가 있다. 실제 오브젝트에 영향을 주려면 다음과 같이 변환한다
Modify > Convert > Smooth Mesh Preview to Polygons
Proxy > Subdiv Proxy
매뉴얼엔 없지만 다음과 같이 하는 방법도 있을 것임
Modify > Convert > Polygons to Subdiv
인용 : Smooth Mesh Preview affects only the display of the polygon mesh in the scene view. If you render the mesh while Smooth Mesh Preview is turned on the mesh will appear in its original un-smoothed state in the final image. If you want the mesh to appear smoothed in a rendering you can convert the smooth preview to a smoothed polygon mesh using Modify > Convert > Smooth Mesh Preview to Polygons or to a subdiv proxy using Proxy > Subdiv Proxy.
출처 : User Guide > Modeling > Polygonal Modeling > Polygons nodes > Smooth Mesh
키워드 : subdiv proxy, subdivision, sub-D

Friday, May 6, 2011

Maya 에서 오른클릭하면 메뉴에 나오는 "Complete Tool" 은 무엇인가?

질문 : Context menu 에 Complete Tool 과 Select All 이 뜨는데 Complete Tool 이란?
답 :
Complete Tool 은 예를 들면 curve 를 그릴 때 drawing 하는걸 끝내는 기능이다 (enter key 누르는 것과 동일)
종종 무의미한 곳에서 Complete Tool 메뉴가 뜨곤 하는데 이 경우는 아무것도 해주지 않는다.
마야가 Context 를 잘못 파악하여 내보내는 context menu 이므로 신경쓰지 않아도 된다.

포토샵에서 원 또는 사각형 등 그리는 법

질문 : 포토샵에서 circle, rectangle 등을 그리려면
답 : 원 그리는 방법을 요약하면
  1. Marquee 를 원 모양으로, brush feather 를 0 으로 하고
  2. 원 형태를 select 한 후
  3. Edit > Stroke 하면 됨 (이때 두께 선택 가능)
참고 : 이 방법을 이용해서 만화 말풍선을 만들 수도 있음 
키워드 : talk balloon, manga, comics, border, photoshop

Global illumination and Final Gathering 설명 잘된 것

다음 레퍼런스에 잘 나와 있음
레퍼런스 : Global Illumination and Final Gather in MR explained
미러 : global illumination and Final Gathering

Wednesday, May 4, 2011

지브러시의 SubTool 사용시 혼동하기 쉬운 것

다음과 같은 특징을 알아두면 헷갈리지 않는다
  1. SubTool 의 visibility 전부 꺼 놓으면 현재 선택된 SubTool 만 보인다
  2. 현재 선택된 SubTool 의 visibility 를 켜면 모든 서브툴의 visibility 가 켜지고
    현재 선택된 SubTool 의 visibility 를 끄면 모든 서브툴의 visibility 가 꺼진다
키워드 : eye icon, show, hide

SubTool Subpalette 에서 집합기호 같은 아이콘은 무엇인가?

질문 : SubTool Subpalette 에서 집합기호 같은 icon은 무엇인가?
답 : 이것은 boolean operation 시 즉 subtools 를 extract 나 merge 할때 쓰이는 모드이다
boolean operation 을 안할 때는 영향이 없음
인용 : They only come into effect if you use the boolean function to combine meshes
레퍼런스 : What does the areas that I have pointed to do in subtools

SubTool Subpalette 의 Extract 란

질문 : SubTool Subpalette 의 Extract 란
답 : Extract: Extracts a new mesh from the masked area of the currently selected model or subtool, and puts it into the model's subtool list.
레퍼런스 : Tool:SubTool Subpalette

Tuesday, May 3, 2011

ZBrush 에서 Adaptive Skinning 과 Unified Skinning 의 차이

질문 : Adaptive Skinning 과 Unified Skinning 의 차이는 무엇인가?

답 :
이들 둘은 ZSphere 모델을 스키닝하는 두가지 방법으로
Adaptive skinning 은 토폴로지를 잘 컨트롤할 수 있는 방법이고
Unified Skinning 은 토폴로지를 컨트롤하고 싶지 않을때 주로 쓰인다

따라서 최종 모델을 만들 목적으로는 Adaptive skinning 만이 쓰이고
Unified Skinning 은 완성품이 아닌 프로토타입을 만들 목적 정도로만 쓰임
(실제론 거의 안쓰는듯)

Adaptive skinning 은 지스피어를 quad 로 이루어진 모델로 보고 스키닝하는데
그 모델의 해상도는 Tool:Adaptive Skin:IRes 에서 지정해준 값으로 된다
(결과물은 주로 좋은 토폴로지의 저해상도 모델이 됨)

Unified Skinning 은 지스피어들을 그냥 그 형태 그대로 보고 스키닝한다
(결과물은 주로 토폴로지를 신경쓰지 않은 고해상도 모델이 됨)

레퍼런스 : ZSpheres: Adaptive Skin

지브러시 4에서 Topology 작업시의 troubleshooting

Symmetry 나타내는 point가 잘못된 위치에 표시되는 현상
질문 : 지브러시 Topology 작업시 symmetry 나타내는 점이 잘못된 위치에 찍히면?
답 : 버그인데 p 눌러서 perspective 를 끄면 제대로 나타남 (orghographic view 에서는 버그가 없음)

질문 : Ctrl click 으로 포인트를 찍으려 하는데, 안찍힌다면
답 : Ctrl click 은 새 포인트를 찍는 기능이 아니라 기존의 포인트를 select 하는 기능이다.
topology mesh 가 없는 지점에 새 포인트를 생성하려면 그냥 클릭해야 한다.

Monday, May 2, 2011

지브러시 Topology 작업시 모델이 투명해서 작업하기 힘들다면

질문 : Topology 작업시 모델이 투명해서 작업하기 힘들다면
답 : 다음 링크대로 하면 말끔히 해결됨.
ZBrush 에서 retopology 할때 backface culling 안되는 문제 해결법
참고 : Preferences >> Draw >> Ghost 에서
Back opacity 를 0 로 만들어 쓰는 사람도 있는데 이는 근본적인 해결이 못됨
레퍼런스 : Ghost Transparency
ZBrush 3.5 what's new documentation
키워드 : Retopology, transparent

ZBrush 4 Shortcuts (Hotkeys)

Custom Hotkey
커스텀 핫키를 지정하려면
  1. Ctrl + Alt 누르고 핫키 지정할 아이템을 클릭한 후,
  2. 누르고 있던 키에서 손을 떼고
  3. 핫키로 쓸 키를 누르면 된다
예를 들어 Move brush 는 1, Standard brush 는 2 로 지정해둘 수 있다.
레퍼런스 : Custom Hotkeys


다음은 디폴트 핫키

유용한 것들
Draw Size : S (Draw size 를 할 때는 그냥 space bar 가 더 편함)
Focal Shift : O
RGB Intensity : I
Z Intensity : U

다음은 이상하게 잘 작동하지 않는다 (버그?)
Increase Draw Size by set units : ]
Decrease Draw Size by set units : [
(set increment in the Zplugin > Misc Utilities > Brush Increment slider)

Topology 작업(retopology)할때 지금껏 만든 것을 프리뷰: a 를 누르면 됨
Lightbox Show/hide : ,
Perspective : P
Floor Grid (바닥 plane) 보이기 : Shift + P
Draw Polyframe : Shift + F

Projection Master – G
Lazy mouse : L

Show QuickMenu - Spacebar or Right Mouse click (마우스클릭보다 스페이스 바가 더 편함)
Viewport 크기 : +/-

아주 기초적인 것들
Edit mode on/off : T
Draw, Move, Scale, Rotate : QWER
Toggle ZAdd and ZSub : Alt (hold down)
ZSpheres > Preview Adaptive Skin : A

Add a child ZSphere - drag ZSphere
Delete ZSphere - Alt+Click ZSphere
Add a child ZSphere at same size – Click+drag, press Shift
Add a child ZSphere and scale Link Spheres – Click+drag to size new ZSphere, press Ctrl+drag
Insert ZSphere - Click Link-Sphere

Activate Symmetry : X

Divide - Ctrl+D
Lower Res - Shift+D
Higher Res - D

메쉬 show/hide 관련
Show mesh portion : Shift+Ctrl+Click, release keys & drag (green selection area)
Hide mesh portion : Shift+Ctrl+Click, release keys & drag - press Alt (red selection area)

Mask 관련
Paint mask on object (alphas/strokes can be used) : Ctrl (hold down)
Delete or paint reverse mask : Ctrl+Alt (hold down)
Reverse mask : Ctrl+Click Background
Clear Mask : Ctrl+Click+ drag Background

Select Masking Brush : hold Ctrl while selecting brush from popup
Blur mask : Ctrl+Click on mesh
Sharpen mask : Ctrl+Alt+Click on mesh

레퍼런스 : http://www.pixologic.com/docs/index.php/ZBrush_4_Shortcuts

Sunday, May 1, 2011

ZBrush 에서 retopology 하는 방법

질문 : ZBrush 에서 모델링 것 토폴로지 수정하는 법?
관련강좌 : Digital Tutors 의 ZSphere Modeling in ZBrush
관련링크 : http://www.pixologic.com/docs/index.php/Topology
키워드 : retopo

Tuesday, April 26, 2011

Bump map 의 Bump Filter 란?

질문 : Bump map 의 Bump Filter 란?
답 : Bump Filter 는 screen space 에 적용되는 필터로 1.0 보다 크면 smooth 해지고
1.0 보다 작으면 sharp 해진다.
레퍼런스 : 마야 Help > User Guide > Rendering and Render Setup > Shading > Shading Nodes > Maya Render Nodes > Utilities > Bump 2d

Mental Ray의 displacement map Approximation 방식(parametric, spatial 등)의 차이는?

질문 : Mental Ray의 displacement map Approximation 방식(parametric, spatial 등)의 차이는 무엇인가?
답 : 다음 레퍼런스에 잘 설명되어 있다
레퍼런스 : mental ray for maya - Approximations
미러 : Mental Ray에서 displacement map Approximation option-parametric, spatial

Color Management

Color Management 의 필요성
    Color Management 라는 것이 필요한 이유는 다음과 같다
        Color is device dependent
    즉 컬러라는 것은 그것을 보여주는 디바이스의 특성에서 자유롭지 못하다
    심지어 우리가 보면서 작업하는 모니터도 device dependent 한 컬러라는 한계가 있다
    따라서 모니터가 되도록 정확한 색을 내도록 만드는 조정 작업은 물론
    컴퓨터로 만든 컬러 데이터가 결과물(영화 필름, 인쇄물 등)로 만들어질때
    정확한 컬러로 옮겨지게 하는 것이 중요하다
말하자면 Color Management 의 목적은 다음과 같다
  •    각 디바이스가 최대한 정확한 컬러를 표시하는 것
  •    각 디바이스 간에 컬러를 정확히 옮기는 것
Color managed system 의 3가지 기본 요소
    1. A device-independent color space 디바이스에 독립적인 컬러스페이스
    2. ICC profiles for each device 즉 각 디바이스의 컬러 특성 데이터
    3. A Color Matching Module (CMM) 즉 번역기
Working Space
device-independent color space 란 Working Space 라고 하며 예를 들어
포토샵에서 이미지 파일을 에디트할 때 사용되는 컬러 스페이스가 바로
Working Space 이다. sRGB, Adobe RGB (Adobe 98) 가 가장 많이 쓰인다.
어떤 문헌에
    Consumer class film and flatbed scanner applications have been
    ICC aware for some time now, with the vendors usually choosing
    sRGB as their preferred color space, which is a bit of a misnomer
    because sRGB is not a device color space.
이렇게 써져 있는데, 그 이유는 sRGB 가 Working Space 즉
device-independent color space 이기 때문이다

Color management & Device profile
Color managed system 의 3요소를 다시 써보면
    1. 디바이스에 독립적인 컬러 스페이스 (Working space)
    2. 디바이스에 dependent 한 컬러 스페이스 (각 디바이스의 ICC profiles)
    3. 1과 2를 번역해주는 모듈
Device profile 에는 두가지가 있다.
  • Input profile : 디지털 카메라, 스캐너
  • Output profile : 모니터, 프린터, film recorder
보통 쓰이는 color management 방식은 ICC-compatible 인데, ICC-compatible 이 아닌 경우도 있다
예를 들면 영화 필름의 프리뷰에서는 3D LUTs 를 사용한다
    In the film industry, 3D LUTs (lookup tables) are used to calculate preview colors
    for a monitor or digital projector of how an image will be reproduced on the final film print.
    (출처 : http://en.wikipedia.org/wiki/Color_management, http://en.wikipedia.org/wiki/3D_LUT)
Proof Colors
    Proof Colors 라는 것은 쉽게 말해 최종 출력될 색상을 프리뷰해보는 기능이다
    포샵 작업은 컴퓨터 모니터를 보며 하지만 결국 그것은 어딘가로 출력하기 위해 작업하는 것이다
    최종 결과물의 색상이 원치않는 색이 된다면 작업이 무의미할 것이다
    중요한 기능이므로 Command(Ctrl) + Y 라는 단축키가 지정되어 있다
    Proof Colors 로 무엇을 프리뷰할 것인가는 View > Proof Setup 메뉴에서 정해줄 수 있는데
    디폴트로는 인쇄물 즉 CMYK 로 지정되어 있다
    Ctrl + Y 를 누를 때 CMYK 모드가 되는 것은 그 이유에서이다
  
    당연하지만 모니터가 좋지 않으면 정확한 색을 프리뷰할 수 없다
    좋은 모니터를 산 후 제대로 calibrate 해야만 정확한 color 작업이 가능하다
Color Settings
그러면 포토샵의 Edit > Color Settings 를 알아보자
결국 지금까지의 모든 것이 이를 이해하기 위해서이다
Photoshop 의 Edit > Color Settings 에서 지정해줄 수 있는 것은 크게 두가지이다
    1. Working Spaces : 포샵 작업은 어떤 Working space 상에서 할 것인가
    2. Color Management Policies :
        working space 와 file 의 embeded 의 컬러스페이스가 다를 경우 어떻게 할 것인가
        → working space 로 변환하는 방법과 embeded 컬러 스페이스를 쓰는 방법 두가지가 있다
검색어 :
    google > photoshop color profile
    google > embedded color profile
레퍼런스 :
    http://en.wikipedia.org/wiki/Color_management

    Photoshop CS3 Colour Management Primer
    http://www.computer-darkroom.com/ps10_colour/ps10_1.htm
    (미러 : Photoshop Color Management Primer)

    Color Management - CambridgeInCoulour Tutorials
    http://www.cambridgeincolour.com/tutorials.htm

    http://en.wikipedia.org/wiki/3D_LUT

    http://en.wikipedia.org/wiki/SRGB
  
    http://en.wikipedia.org/wiki/Color_calibration
  
    Apple Display Calibration Utility
    http://www.computer-darkroom.com/colorsync-display/colorsync_1.htm
미러 : Color Management, ICC profile, Adobe 98, sRGB, Proof Colors

Monday, April 25, 2011

포토샵의 Overlay Blending Mode 란?

질문 : 포토샵의 Overlay Blending Mode 란?
답 : Multiply 와 Screen 블렌딩모드의 조합으로, 밝은 부분에는 Screen 을, 어두운 부분에는 Multiply 를 쓴 것.
참고 : Multiply 는 A x B, Screen 은 (1-A) x (1-B) 와 같음. 서로 반대인 셈.
레퍼런스 : The Overlay Blending Mode - About Blending Modes in Photoshop and other Graphics Software

Maya 에서 attribute editor 를 특정 object 에 fix 하려면

질문 : 다른 물체가 선택되어도 attribute editor 는 특정 물체의 것으로 고정시키려면?
답 : attribute editor 에서 Load > Auto Load Selected Attributes 를 체크 끔

ZBrush 의 S.Pivot / C.Pivot

질문 : ZBrush 에서 S.Pivot 과 C.Pivot 이란?
답 : Set Pivot 과 Clear Pivot 으로, Ctrl + Shift drag 로 모델의 일부만 보이게 한 후 보이는 폴리곤들을 중심으로 pivot 을 새로 설정하거나 clear 할때 사용되는 기능. 그런데 사실 모델 위에 Right Button Click 하고 drag 하면 그 점을 중심으로 rotate 하므로 S.Pivot 나 C.Pivot 를 쓸 일은 별로 없음
레퍼런스 : How to fix the pivot of model?????
初めてのZBrush(11)~[Local]と[S.Pivot]~ → 좋은 강좌

Sunday, April 24, 2011

projection master 에서 텍스처의 rotation 이 안된다면

질문 : zbrush 의 projection master 에서 texture 를 물체 위에 그려주려 하는데 rotate 할수가 없는데 어떻게 하나
답 : Simple Brush 를 쓰지 말고 Directional Brush 로 바꾸면 잘 된다.
디폴트 브러시인 Simple Brush 상태일 경우 텍스처를 오브젝트 표면에 그려주려 하면
translate, zoom 버튼은 active 한데 rotate 버튼만 inactive 해서 처음에
혼란되기 쉬우므로 주의 요망
인용 : if you use the Directional Brush instead of the Simple Brush you'll be able to rotate
레퍼런스 : Projection Master - Rotate function broken

ZBrush 에서 Bump map 작업을 하려면

질문 : ZBrush 에 Bump Viewer Material 이 없는데 어디 있나?
답 : Standard Materials 에 보면 BumpViewerMate 라는 것이 있는데 이걸 선택하면 알파맵 적용한 것이 범프맵으로 간주되어 범프를 볼 수 있다. 버전 3.1까지는 Bump Viewer Material 이라는 이름으로 Application dir/ZMaterials/BumpViewerMaterial.zmt 으로 들어 있었는데 버전 4부터는 Standard Materials 에서 바로 볼 수 있음.
레퍼런스 : http://www.pixologic.com/docs/index.php/Painting_Bump_Maps

Gnomon Alpha Browser

The Gnomon Alpha Library Browser

ZBrush 의 Display Properties 란

질문 : ZBrush 의 Display Properties 란?
답 : This subpalette affects the way objects are drawn on the ZBrush canvas. In general, these settings do not affect the models themselves, simply the way they they are drawn in the ZBrush window.
출처 : Tool:Display Properties Subpalette

Saturday, April 23, 2011

ZBrush 4 플러그인들

지브러시 plug-in 들은 하나하나가 모두 유용하므로 사용법을 모두 숙지하는게 좋음
http://www.pixologic.com/zbrush/downloadcenter/zplugins/
ZAppLink, Image Plane, GoZ, UV Master, Blendshapes 등

플러그인 install 방법
ZBrush가 인스톨되어 있는 폴더/ZStartup/ZPlugs
zsc 파일과 데이터 폴더 등 모든 파일을 넣는다

projection master 에서 텍스처가 회색으로 변해서 쓸수가 없다면

질문 : Hi every time i go into projection master, the texture area goes gray and i cant select the texture i need.
답 : Tool 에서 Simple Brush 를 선택해볼 것.
출처 : Texture grays out in projection master

UV Layout 테스트용 grid texture

질문 : UV Layout 테스트용 grid texture 로 어떤 걸 쓰면 좋을까
답 : google 에서 UV grid tetxure 로 검색해보면 여러가지 나오는데
다음 이미지가 유용

키워드 : util-mark6.png, test
미러 : util-mark6

Maya 에서 UV edit 할때 겹치는 부분 표시하려면

질문 : Maya 에서 UV edit 할때 overlapping 하는 부분을 다른 색깔로 표시하려면
답 : UV Editor menu > Image > Shade UVs

Maya 에서 edit 목적으로 임시로 특정 face 만을 hide 하려면

질문 : Maya 뷰포트에서 특정 face 를 임시로 hide 하는 방법
답 : Isolate select 를 쓴다
레퍼런스 : Can You Hide Faces in Maya?

Maya 의 manipulator size 조절하려면

질문 : Maya 에서 manipulator 의 사이즈를 크거나 작게 하려면
답 : + / - 핫키를 쓰면 된다
레퍼런스 : Autodesk Maya keyboard shortcuts
키워드 : hotkey, shortcut, widget, 위젯

Friday, April 22, 2011

XMP 란

질문 : XMP 란?
답 : Extensible Metadata Platform 의 약자로, Adobe 가 지정한 specification.
파일에 embed 되는 metadata 규격으로, 예를 들어 사진 파일에 들어가는 날짜와 시간 정보, 카메라의 aperture, shutter speed 등이 들어가는 등으로 쓰인다.
부연 : 사용 파일은 PDF, JPEG, JPEG 2000, GIF, PNG, HTML, TIFF, Adobe Illustrator, PSD, MP3, MP4, Audio Video Interleave, WAV, RF64, Audio Interchange File Format, PostScript, Encapsulated PostScript 등.
레퍼런스 : What is XMP?
http://en.wikipedia.org/wiki/Extensible_Metadata_Platform

Thursday, April 21, 2011

Wednesday, April 20, 2011

Adobe Bridge

다량의 그림파일에 대해 batch rename 등의 기능이 필요할 때 쓰기 좋음.
(prefix 나 postfix 를 추가한다거나 하는 작업)
ppt 같은 파일들이 폴더 내에 있을 경우 속도가 심각하게 느려지는 경우가 있으므로
photo 에 대해서만 쓰는게 좋음
레퍼런스 : http://en.wikipedia.org/wiki/Adobe_Bridge
키워드 : CS4, CS5

maya 에서 UV edit 할때 대칭으로 하는 방법

질문 : 마야에서 UV 에디트 할때 symmetry 모드 같은 것 사용하는 법?
답 : Mirror UVs Tool 을 쓰는 방법이 있는데
MEL 스크립트도 아니고 플러그인이라 마야의 나중 버전에서는 쓸수 없게 될듯하다.
UV 전용 툴들도 있긴 하지만 이런 작은 툴들 역시 나중에 사라질 공산이 크다.
이런 종류의 좋은 툴로는 Headus 의 UVLayout 을 쓰거나
Modo 의 UV Symmetry 를 쓰는게 좋다
레퍼런스 : UV Symmetry
modo UV editing includes user defined symmetry axis. Check it out.

maya 의 plugin 파일 포맷

질문 : 플러그인이 윈도우용일 경우 확장자는 mll, 맥용일때는 lib, 리눅스용일때는 so 임.
설명 : On Linux, plug-ins have the extension .so. On Windows, they have the extension .mll. On Mac OS X, the extension is .lib.
On Linux, the default plug-in location is:
/usr/autodesk/maya2011/bin/plug-ins
On Windows, the default plug-in location is:
drive:\Program Files\Autodesk\Maya2011\bin\plug-ins
On Mac OS X, the default locations are:
/Applications/Autodesk/maya2011/Maya.app/Contents/MacOS/plug-ins
and
/Users/Shared/Autodesk/maya/2011
Maya will check both of these locations for valid plug-ins.
출처 : User Guide > General > Basics > Basics Windows and Editors > Plug-in Manager
키워드 : extension

mac os x 에서 maya 의 script path

질문 : os x 에서 MEL 등 스크립트 파일은 어디 넣으면 되나
답 : /Users/유저명/Library/Preferences/Autodesk/maya/버전/scripts/ 에 넣으면 된다
설명 :
Environment Variable 명은 MAYA_SCRIPT_PATH 이다.
윈도우에서는
user's directory/My Documents/maya/버전/scripts
에 넣으면 된다
부연 :
Shelf 등 preference 는 다음에 들어 있음
user's directory/My Documents/maya/버전/prefs/shelves
user's directory/My Documents/maya/버전/prefs/markingMenus
레퍼런스 : http://download.novedge.com/Brands/Alias/Helps/Maya6.5/en_US/Env/filepathvariables.html
(마야 help > Environment Variables > File path variables)
미러 : 마야 help > Environment Variables > File path variables

Maya 에서 Modo 처럼 편한 방식으로 Unwrap 하려면

질문 : Maya 에서 Modo 처럼 자르는 edge 를 지정하는 방식으로 Unwrap 하려면?
답 : Bonus Tools 의 Auto Unwrap UVs Tool 을 쓰면 된다.
설명 :
  1. Autodesk 홈페이지에서 Bonus Tools 를 받아서 깐다
  2. 그러면 마야에 Bonus Tools 메뉴가 생긴다
  3. 거기서 Auto Unwrap UVs Tool 를 실행한다
  4. 그 후에는 edge mode 에서 자를 edge 를 지정해준 후 unwrap 시키면 됨.
다운로드 : http://area.autodesk.com/bonus_tools
키워드 : Modo와 비슷한 방법, Texture, Texturing

Tuesday, April 19, 2011

Maya 에서의 Grow selection 핫키

질문 : Maya 에서 Grow selection 의 hotkey 는?
답 :
< : Shrink polygon selection region
> : Grow polygon selection region
레퍼런스 : Autodesk Maya keyboard shortcuts

Monday, April 18, 2011

Object `row1` not found?

질문 : Deformation order 를 바꾸기 위해 오브젝트에 right click 하고 Inputs > All Inputs 를 실행했더니 이런 에러가 뜨는데 해결 방법은?
답 :
1. Delete all layers you have in the scene.
2. Save your scene without layers.
3. Restart Maya.
4. “Import” your saved scene into the emty one !! don’t open it - just import!!
5. Save new scene.
MEL 을 이용한 방법 (더 간단하다):
Row 1 Not Found, List Deformer Dialog Alternative
http://redesigndavid.me/9748/2010/10/29/list-deformer-alternative/
출처 : http://area.autodesk.com/forum/autodesk-maya/rigging/major-problem-deformation-order/page-last/

polyAverageVertex

polyAverageVertex : 마야에서 특정 부위 버텍스 분포를 스무드하게 해주는 MEL 명령
다음과 같이 쓴다.
polyAverageVertex -iterations 200 "SelectionSet1";
"SelectionSet1" 은 Quick selection set 이름이다
(특정 버텍스들을 "SelectionSet1" 이라는 이름의 Quick Selection Set 으로 만들어준 경우임)
레퍼런스 : Fahrenheit Digital- Skinning for Feature Animation

마야에서 특정 selection 을 저장해서 계속 쓸수 있게 하는 방법?

질문 : 마야에서 특정 selection 을 저장해서 계속 쓸수 있게 하는 방법?
답 : Quick Select Set 을 쓰면 됨
Create > Sets > Quick Select Set 로 만들고
Edit > Quick Selection Sets 으로 선택해서 사용
또는 Create > Sets > Quick Select Set 로 만들때 Shelf 에 올리도록 체크하면
Shelf 에서 바로 선택할 수 있게 됨
레퍼런스 : Quick Selection Sets in Maya

3D 소프트웨어별 카메라 컨트롤

Maya (3 button)
Rotate : Alt + Left Mouse Button
Pan : Alt + Middle Mouse Button
Zoom : Alt + Right Mouse Button
맥에서는 Alt 키 대신 Command 키 눌러도 됨
Maya (2 button) (출처)
Pan : Alt + Command (Ctrl) + Left Mouse Button
Rotate : Alt + Middle Mouse Button
Zoom : Alt + Right Mouse Button
ZBrush
Rotate : Right Mouse Button
Pan : Alt + Right Mouse Button
Zoom : Command (Ctrl) + Right Mouse Button
Modo
Rotate : Alt + Left Mouse Button
Pan : Alt + Shift + Left Mouse Button
Zoom : Alt + Control (Ctrl) + Left Mouse Button
Cinema 4D
Rotate : Press + Hold 3 key
Pan : Press + Hold 1 key
Zoom : Press + Hold 2 key
요약 :
  1. 대체로 카메라 컨트롤시 Alt 키를 누르는 것은 공통적이다
  2. orbit(rotate), pan, dolly(zoom) 기능을 구별하는 것에는
    마우스버튼로 하는 방식(마야)과 키보드로 하는 방식(ZBrush, Modo, Cinema 4D) 두가지가 있다
키워드 : softward, camera control, LBM, MMB, RMB

Saturday, April 16, 2011

ZBrush features

필독해야 할 ZBrush features
http://www.pixologic.com/zbrush/features/01_UI/
What's New in ZBrush 3.5
Understanding Topology, HD Geometry 등

GoZ 사용법

GoZ 사용법
링크 : http://www.pixologic.com/zbrush/features/GoZBrush/
키워드 : GoZ, ZBrush, Maya, Workflow, Pipeline Integration

Thursday, April 14, 2011

다른 어플리케이션의 카메라 조작에 빨리 익숙해지는 법

Tip : 다른 방식의 camera 컨트롤에 빨리 익숙해지려면
카메라 컨트롤 방식이 크게
Rotate, Pan, Zoom(Dolly) 를 구별하는 방식이
  1. 마우스 버튼으로 하는 방식과
  2. 키보드로 하는
두가지가 있음을 기억해두면 좋다.
무작정 다른 방식에 익숙해지려 노력하기보다
해당 어플리케이션이 둘중 어느 방식인가 유형을 먼저 파악한 후
손을 거기에 익숙하게 하면 더 빠르게 적응할 수 있다.

Monday, April 11, 2011

Render Active 해준 후 Shaded view 로 다시 돌아가려면

질문 : 다시 돌아가는 핫키는?
답 : a 키 누르면 redraw 됨
레퍼런스 : Lynda.com - Cinema 4D R12 Essential Training > 0406 Organic modeling Creating a HyperNURBS object

Sunday, April 10, 2011

Cinema 4D 에서 selection mode 로 전환하는 핫키

질문 : Cinema 4D 에서 selection mode 로 전환하는 핫키?
답 : space bar
키워드 : shortcut, hotkey

Saturday, April 9, 2011

Cinema 4D 에서 마야의 f 키와 같은 역할을 하는 것은?

질문 : Cinema 4D 에서 object 에 frame 하기
답 : o 키를 누르면 됨
추가 : 전체 scene frame 은 "h" 키임
키워드 : framing, Maya, F키

Sunday, April 3, 2011

Mental ray network rendering using Satellite and Standalone

멘탈레이 네트워크 렌더링의 두가지 방법
  1. Mental Ray for Maya Satellite : 8개의 remote CPU 사용가능
  2. Mental Ray Standalone
마스터는 네트웍에다가 렌더 request를 보내는 쪽이고
슬레이브는 그것을 받아서 처리하는 쪽으로
슬레이브는 (1)Mental Ray for Maya Satellite 와 (2)Mental Ray Standalone 두 종류가 있다.
하나의 컴퓨터는 동시에 마스터와 슬레이브를 겸할 수 있다.

Mental Ray Standalone 셋업
마야 내에서 또는 배치렌더로 .ma 나 .mb 를 렌더하려면
  1. 마스터에 Mental Ray for Maya 를 설치하고
  2. 슬레이브에 Mental Ray Standalone 을 설치해야 한다.
satellite 에는 못하는 것이 있는데 그건 바로 mi 를 렌더하는 것이다.
  • 커맨드라인으로 .mi 를 렌더하는건 satellite 는 할 수 없다.
  • 커맨드라인으로 .mi 를 렌더하려면 standalone 을 써야 한다.
마스터가 어떤 슬레이브를 사용하는지 지정하기 위해 사용하는 configuration file 은
Mental Ray for Maya 와 Mental Ray Standalone 가 각자 다르다.
  • Mental Ray for Maya 와 Mental Ray for Maya Satellite 는 maya.rayhosts 를 사용
  • Mental Ray Standalone 은 .rayhosts 를 사용

Saturday, April 2, 2011

Backburner의 한계

백버너는 하나의 프레임을 렌더할때 그 작업을 나눠 보내지는 못한다
백버너는 프레임별로 나눠서 렌더링하기 때문에 애니메이션 작업에만 적합하다
따라서 라이트나 텍스처를 테스트하기 위해 렌더를 빨리 해보기 위한 목적에는 부적합

Render farm 관련 자료

레퍼런스 :
Render farm (http://en.wikipedia.org/wiki/Render_farm)
Server farm (http://en.wikipedia.org/wiki/Server_farm)

키워드 : 렌더 팜, 렌더팜

Wednesday, March 30, 2011

Modo에서 마야의 f 키에 해당하는 것?

질문 : Modo에서 object frame 하는 키?(Maya의 f 키에 해당하는 것?)
답 : Shift + A
주의 : Modo 에서 F 키는 polygon 을 flip 하는 것이므로 잘못 누르지 말것
키워드 : 모도, normal

Tuesday, March 29, 2011

Scott Spencer의 Displacement map 강좌

질문 : Displacement map 의 기술적인 면에 대해 모든 것을 알 수 있는 강좌는 없는가?
요약 : Rendering ZBrush Displacement Maps (Scott Spencer) 를 보면 된다
설명 : 2개짜리 비디오 강좌이다.
Sculpting technique이 아니라 기술적인 부분에 대해 모두 알려준다.
첫 비디오에서는 32비트 displacement map 을,
두번째 비디오에서는 16비트 displacement map 을 다룬다.
기타 : 같은 사람이 집필한 다음 책들도 함께 보면 완벽하다.
ZBrush Character Creation - Advanced Digital Sculpting (2008)
ZBrush - Digital Sculpting Human Anatomy (2010)
링크 : 여기서 구매하면 된다
http://www.thegnomonworkshop.com/store/category/232/Scott-Spencer
키워드 : 디스플레이스먼트 맵
미러 : Gnomonology Rendering Zbrush Displacement Maps - Scott Spencer
Scott Spencer ZBrush - Digital Sculpting Human Anatomy (2010)
Scott Spencer - ZBrush Character Creation - Advanced Digital Sculpting (2008)

Displacement map 의 3요소

Displacement map 의 3요소
1. Primary form ... 전체적인 형태. 이건 base polygon으로 형성됨
2. Secondary form ... 주름 등. Displacement map 노드의 Alpha Gain 으로 조절
3. Tertiary form ... Fine detail. Approximation (Tessellation) Setting 으로 조절
출처 : Gnomonology Rendering Zbrush Displacement Maps - Scott Spencer 2번째 비디오
키워드 : 디스플레이스먼트 맵

Monday, March 28, 2011

GUV 란

질문 : GUV 란 무엇인가
요약 : Scott Spencer 의 ZBrush Character Creation - Advanced Digital Sculpting (2008) 을 참조할 것.
키워드 : Zbrush, 지브러시
미러 : Scott Spencer - ZBrush Character Creation - Advanced Digital Sculpting (2008)

Sunday, March 27, 2011

Maya의 Viewport의 background color 바꾸는 핫키

질문 : Maya의 뷰포트의 배경색 바꾸는 shortcut은?
요약 : Alt + B 하면 된다

Maya에서 imf_copy 의 -p flag 의 의미

질문 : Maya에서 imf_copy 의 -p flag 의 의미는?
요약 : pyramid format 을 의미함.
설명 (인용) : The -p (pyramid) flag creates a multi-resolution file, which 'nests' differnet image sizes into the .map file, enabling different resolutions to be used at rendertime based on camera distance, etc.
You'll want to run imf_copy with both the -p and -r options. This makes it an image pyramid, and it also makes it tiled, so mental ray can use texture cacheing with the file.
출처 : http://forums.cgsociety.org/archive/index.php/t-652048.html
키워드 : displacement map, zbrush, 마야, 지브러시

Friday, March 25, 2011

MODO 에서 SDS Subdivide option 띄우는 법

질문 : MODO 에서 SDS Subdivide option 띄우는 법은?
요약 : Shift + D 누르면 된다.
설명 : 그냥 D 누르면 기본 옵션으로 subdivide 되는데
Subdivision method 나 Max smooth angle 옵션을 지정해주려면
Shift + D 누르면 옵션 다이얼로그가 뜬다.
출처 : Real World modo - In the Trenches with Modo
미러 : Real World modo - In the Trenches with Modo

Wavefront .OBJ file format

요약 :
The OBJ file format is a simple data-format that represents 3D geometry alone — namely, the position of each vertex, the UV position of each texture coordinate vertex, normals, and the faces that make each polygon defined as a list of vertices, and texture vertices.

설명 :

# List of Vertices, with (x,y,z[,w]) coordinates, w is optional.
v 0.123 0.234 0.345 1.0
v ...
...

# Texture coordinates, in (u,v[,w]) coordinates, w is optional.
vt 0.500 -1.352 [0.234]
vt ...
...

# Normals in (x,y,z) form; normals might not be unit.
vn 0.707 0.000 0.707
vn ...
...

# Face Definitions (see below) ... vertex/texture/normal indices
f 1 2 3
f 3/1 4/2 5/3
f 6/4/1 3/5/3 7/6/5
f ...
...

출처 : http://en.wikipedia.org/wiki/Wavefront_.obj_file

MODO 에서 view 전환용 dial menu 띄우는 법


질문 : MODO 에서 dial menu 띄우는 법?
요약 : Ctrl + Space bar
레퍼런스 : Digital Tutors-Introduction to Modo > 02. Navigating the interface (camera)
키워드 : circular menu, popup menu, persp, top, right, left

Monday, March 21, 2011

포토샵에서 Rectangular Marquee 툴과 Elliptical Marquee 툴 전환하는 hotkey는?

질문 : 포토샵에서 Rectangular Marquee 툴과 Elliptical Marquee 툴 전환하는 핫키?
요약 : Shift + M
설명 : 그냥 M 누르면 툴간 전환만 됨.
키워드 : Circular, Circle, 원, shortcut, selection, tool

Saturday, March 12, 2011

무게 단위 감잡기

100g 은 어느 정도의 무게인가?
딸기 하나의 무게 = 약 20g
즉 100그램이면 딸기 5개 정도의 무게
키워드 : estimation, 그람, gram

Thursday, March 3, 2011

Photoshop 에서 100% (실제 크기)로 zoom 하는 핫키

질문 : Photoshop 에서 100% (실제 크기)로 zoom 하는 핫키?
요약 : Actual Pixels 사용

Tuesday, February 15, 2011

Decibels dB 감잡기

dB has got 2 different applications :
1. Decibel SPL (dB SPL)
unit used to measure the strength of sound, in terms of sound pressure levels
194 dB : Shock waves
130 dB : threshold of pain
110 dB : Chain saw
90 dB : Lawn mower
60 dB : Conversation
20 dB : Whispering
0 dB : Threshold of human hearing
2. Decibel (dB)
unit used to measure the loudness of sound, in terms of audio level or signal
출처 : Lynda.Com-Digital Audio Principles
키워드 : 데시벨

Auto-Tune

'오토튠'이란… 음정 다듬어주는 '소리의 포토샵'
http://news.chosun.com/site/data/html_dir/2011/02/07/2011020702076.html

Thursday, February 3, 2011

Anterior superior iliac spine


The anterior superior iliac spine (ASIS) is an important landmark of surface anatomy. It refers to the anterior extremity of the iliac crest of the pelvis, which provides attachment for the inguinal ligament, the sartorius muscle, and the tensor fasciae latae.
레퍼런스 : http://en.wikipedia.org/wiki/Anterior_superior_iliac_spine

Tuesday, February 1, 2011

인체 proportion 을 위한 inch

inch 와 cm
인체 proportion 을 다룰때 inch 단위로 생각하면 감잡기 편하다.
1 inch = 2.54 cm
이지만 인치 단위는 정확한 길이보다는 비율을 생각하기 위한 도구로 생각하면 좋음
어차피 인치는 인체 길이를 기준으로 만들어진 단위 (1 inch = 1/12 feet)

대략의 인체 사이즈
6 inches = 15.24 cm ... 6 inches 는 head 의 width 임
8 inches = 20.32 cm ... 8 inches 는 head 의 length 임

대략 1 inch 를 2.5 cm 로 생각하면

6 inches = 15 cm
8 inches = 20 cm

가 되는데 이렇게 해도 별 차이는 없음

길이 감잡기
한뼘을 느슨하게 정의해서, 손을 한껏 벌리지 않고 가볍게 벌린 한뼘으로 정의하면
6 인치 = 여자 손으로 한뼘
8 인치 = 남자 손으로 한뼘
(실제로, 7 인치 정도를 한뼘(span)으로 정의하기도 한다)

12 인치 = rib cage 의 세로 길이
6 인치 = clavicle 의 길이
6 인치 = scapula 의 가로, 세로 길이
6 인치 = top of head 부터 코 밑까지의 길이
6 인치 = 코 밑에서 neck 의 pit 까지의 길이
6 인치 = neck 의 pit 부터 bottom of the sternum (명치) 까지의 길이
6 인치 = 명치부터 rib cage 밑까지의 길이
4 인치 = handbreadth 라는 단위
3 인치 = 대략 rib cage 최하단에서 pelvis 최상단에서 까지의 길이.
3 인치 = 대략의 목길이

인용
the international inch is defined to be equal to exactly 25.4 millimeters (위키)

Sunday, January 30, 2011

Vilppu Anatomy 강좌 DVD

Drawing Anatomy Lecture Series Set (15 DVD's included)
1. Head Anatomy and Construction, Pt 1
2. Head Anatomy and Construction, Pt 2
3. Head Anatomy and Construction, Pt 3
4. Head Drawing Demonstration, Pt 2
5. Head Drawing Demonstration, Pt 3 and Expressions
6. Anatomy of the Feet
7. Anatomy of the Neck
8. Anatomy of the Upper Torso
9. Anatomy of the Pelvis
10. Anatomy of the Upper Leg
11. Anatomy of the Lower Leg
12. Anatomy of the Upper Arm
13. Anatomy of the Lower Arm
14. Anatomy of the Hand
15. Proportions
링크 : http://www.vilppustore.com/anatdvd.htm

Thursday, January 27, 2011

Stem mixing and mastering

질문 : Mixing 에서 Stem 이란 무엇인가?
레퍼런스 : http://en.wikipedia.org/wiki/Stem_mixing_and_mastering

Monday, January 17, 2011

Sound의 frequency(kHz)와 loudness(dB) 감잡기

Audio Frequency
요약 : Our ears are most sensitive to frequencies around 4kHz
레퍼런스 : http://en.wikipedia.org/wiki/Audio_frequency

dB(Decibel)
설명 : 나중에 정리
http://en.wikipedia.org/wiki/Decibel
http://en.wikipedia.org/wiki/Frequency_weighting

키워드 :volume, 주파수, 볼륨, 소리 크기, 가청 영역

Saturday, January 15, 2011

Compreession 에서의 Attack and release

질문 : Compreession 에서의 Attack and release 란?
요약 :
Attack이란 compress 가 적용될때의 딜레이.
Release 는 compress 가 풀릴때의 딜레이.
설명 : 특정 레벨을 넘어가서 compress 가 적용될때, 그게 바로 적용되는게 아니라 약간의 딜레이를 갖고 적용되는데 그 시간이 attack 이다. 특정 레벨 이하가 되어 release 가 적용될 때, 바로 적용되는게 아니라 약간의 딜레이를 갖고 적용되는데 그 시간이 release 이다.
레퍼런스 : http://en.wikipedia.org/wiki/Dynamic_range_compression#Compressor_features 의 Attack and release

Compression 이란

질문 : Compression 이란?
요약 : 큰소리와 작은 소리의 편차를 적게 해서 균일하게 해주는 것.
부연 : 큰 소리를 작게 한 후 makeup gain 으로 전반적으로 볼륨을 올려주는 것이 보통이다(Compression 이라는 용어 자체에 큰소리를 압축해서 줄여준다는 의미가 들어있음). 특정 frequency 에 대해 더 많이 compression 을 가하는 것으로 De-essing 이 있고(쉿 소리 없애줌), 외부 시그널에 의해 compression 의 양을 변화시키는 것을 Side-chaining 이라고 한다(DJ 가 말할때 음악 소리가 작아지는 효과).
설명 : Dynamic range compression, also called DRC (often seen in DVD and car CD player settings) or simply compression, is a process that reduces the dynamic range of an audio signal, that is, narrows the difference between high and low audio levels or volumes.
레퍼런스 : http://en.wikipedia.org/wiki/Dynamic_range_compression
키워드 : EQ

De-essing

질문 : De-essing 이란
요약 : compressor 를 이용해서 쉿 소리를 없애는 것. 쉿 소리에 해당하는 부분만 많이 compress 함.
설명 : De-essing is any technique intended to reduce or eliminate excess sibilant consonants such as "s", "z" and "sh" in recordings of the human voice.[1] Excess sibilance can be caused by compression, microphone choice and technique, and even simply a singer's mouth. Sibilance lies in frequencies anywhere between 2 kHz-10 kHz, depending on the individual.
레퍼런스 : http://en.wikipedia.org/wiki/De-essing
키워드 : Dynamic range compression, DRC

Side chaining

질문 : Side chaining 이란?
요약 : 외부 시그널로 EQ효과를 조절하는 기능. 대표적인 예로 음악과 목소리가 mix 될때, 목소리가 커지면 음악이 작아지는 효과.
설명 :
Side-chaining may use the level of another signal so that when the external signal is stronger the compressor acts more strongly to reduce output gain. This is used by disc jockeys for ducking - lowering the music volume automatically when speaking.
출처 : http://en.wikipedia.org/wiki/Dynamic_range_compression#Side-chaining
키워드 : Sidechain, side chain, Dynamic range compression, DRC

Wednesday, January 12, 2011

Color 이론에 대해 잘 설명한 사이트

color matching functions(색대응함수)등에 대해 잘 설명한 사이트
http://www.handprint.com/LS/CVS/color.html
http://www.handprint.com/
미러 : Color Theory 컬러이론