이미지 공유 사이트, 주제별 이미지 검색 제공하는 해외사이트
http://ffffound.com/
https://twitter.com/guream_bot

Saturday, August 31, 2013
Tuesday, August 27, 2013
Decibel (Loudness) Comparison Chart
Decibel (Loudness) Comparison Chart
Here are some interesting numbers, collected from a variety of sources, that help one to understand the volume levels of various sources and how they can affect our hearing.
Environmental Noise | |
| Weakest sound heard | 0dB |
| Whisper Quiet Library at 6' | 30dB |
| Normal conversation at 3' | 60-65dB |
| Telephone dial tone | 80dB |
| City Traffic (inside car) | 85dB |
| Train whistle at 500', Truck Traffic | 90dB |
| Jackhammer at 50' | 95dB |
| Subway train at 200' | 95dB |
| Level at which sustained exposure may result in hearing loss | 90 - 95dB |
| Hand Drill | 98dB |
| Power mower at 3' | 107dB |
| Snowmobile, Motorcycle | 100dB |
| Power saw at 3' | 110dB |
| Sandblasting, Loud Rock Concert | 115dB |
| Pain begins | 125dB |
| Pneumatic riveter at 4' | 125dB |
| Even short term exposure can cause permanent damage - Loudest recommended exposure WITHhearing protection | 140dB |
| Jet engine at 100' | 140dB |
| 12 Gauge Shotgun Blast | 165dB |
| Death of hearing tissue | 180dB |
| Loudest sound possible | 194dB |
출처 : http://www.gcaudio.com/resources/howtos/loudness.html
키워드 : 감잡기, dB, 데시벨
Saturday, August 24, 2013
Modo 에서 Backdrop (image plane) 사용법
1. Backdrop item 을 생성한다.
2. 그림파일을 drag and drop 으로 Backdrop item 에 끌어 넣는다.
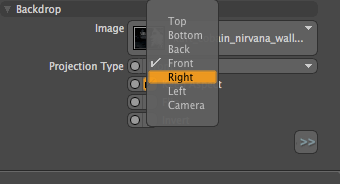
3. Backdrop item 의 Properties 에서 Projection Type 를 적절히 선택. 디폴트 값은 Front 이다.
4. 사이드 뷰의 백드롭 아이템을 만들때는 Projection Type 를 Right 나 Left 로 선택해서 방향을 맞춰준다.
주의할 점은 사이드 이미지를 만들때 Backdrop item 을 Rotate tool 로 90도만큼 돌려서 만들면
view 가 perspective 상태에서는 보이지만 정작 viewport 를 left 나 right 로 만들 때 보이지 않는다는 점이다. 처음 쓸때 자주 저지르는 실수.
2. 그림파일을 drag and drop 으로 Backdrop item 에 끌어 넣는다.
3. Backdrop item 의 Properties 에서 Projection Type 를 적절히 선택. 디폴트 값은 Front 이다.
4. 사이드 뷰의 백드롭 아이템을 만들때는 Projection Type 를 Right 나 Left 로 선택해서 방향을 맞춰준다.
주의할 점은 사이드 이미지를 만들때 Backdrop item 을 Rotate tool 로 90도만큼 돌려서 만들면
view 가 perspective 상태에서는 보이지만 정작 viewport 를 left 나 right 로 만들 때 보이지 않는다는 점이다. 처음 쓸때 자주 저지르는 실수.
Friday, August 23, 2013
Wireframe, topology 관련 자료
와이어프레임 및 토폴로지 관련 자료
http://www.gotwires.info/search/label/Steven%20Stahlberg
Realistic Human Face Modeling
http://www.phungdinhdung.com/Studies_paper/Realistic_face_modeling.shtm
키워드 : 와이어, character, human modelling, 3D
http://www.gotwires.info/search/label/Steven%20Stahlberg
Realistic Human Face Modeling
http://www.phungdinhdung.com/Studies_paper/Realistic_face_modeling.shtm
키워드 : 와이어, character, human modelling, 3D

Thursday, August 22, 2013
modo 의 Center Selected 와 vert.set x 0
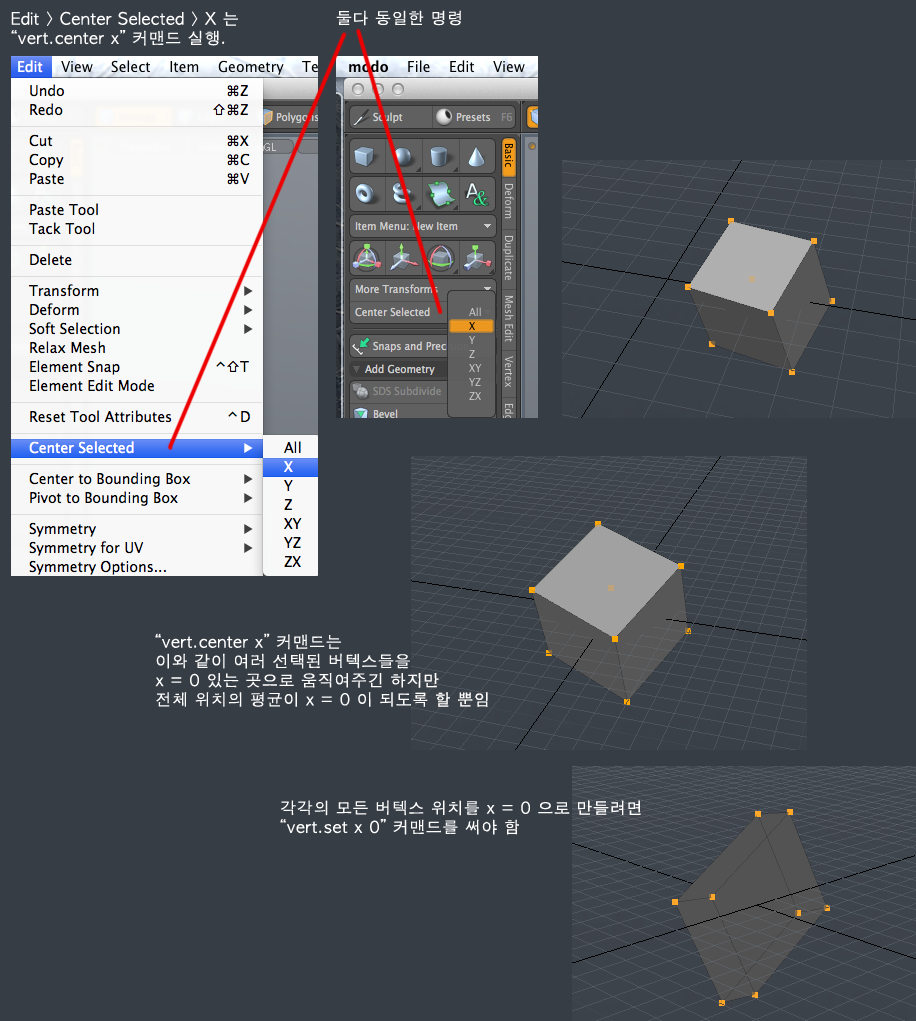
다음은 버텍스의 x 값을 0 으로 만들어주는 두가지 방법 즉
Center Selected (vert.center x) 와 vert.set x 0 을 비교한 것이다.
vertex 하나에 대해서는 둘다 결과가 같지만
여러 vertices를 선택하는 경우 결과는 달라진다.
Center Selected (vert.center x) 와 vert.set x 0 을 비교한 것이다.
vertex 하나에 대해서는 둘다 결과가 같지만
여러 vertices를 선택하는 경우 결과는 달라진다.
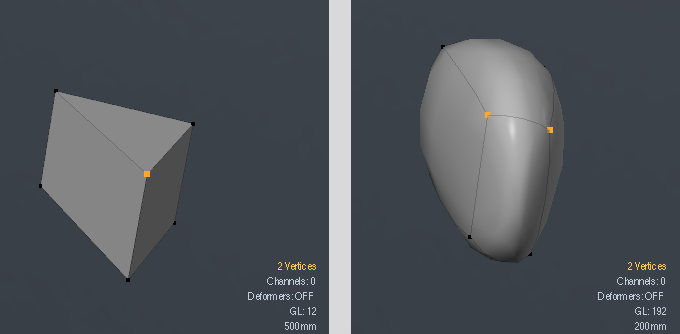
modo 에서 완전히 겹쳐져 있는 두개의 vertex 중에서 하나만 선택하는 법
tab 을 누르면 분리되어 보이므로, 둘중 하나를 선택하는 것이 가능해진다.
키워드 : select, vertices, exactly, same position, 2 vertices
키워드 : select, vertices, exactly, same position, 2 vertices
Wednesday, August 21, 2013
modo bridge tool 의 다른 용도
다음과 같이 구멍을 뚫을 때도 사용 가능.
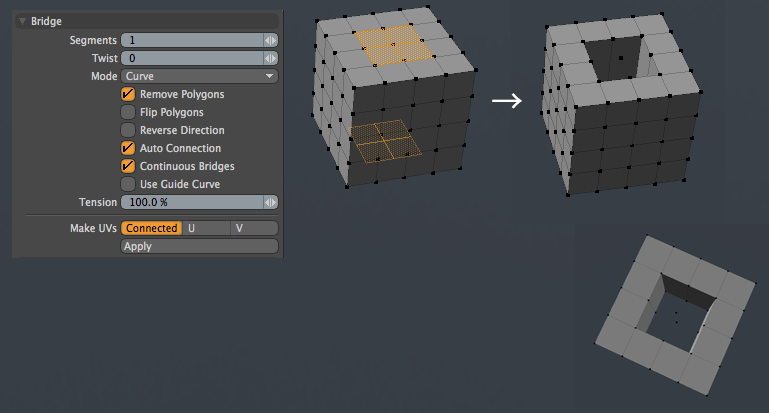
그냥 디폴트 세팅으로 하면 된다.
(잘 보면 구멍 뚫린 곳에 버텍스는 남아 있다)
레퍼런스 : Topic - Easy way to create doors and windows opening in a wall? - Single Post View
그냥 디폴트 세팅으로 하면 된다.
(잘 보면 구멍 뚫린 곳에 버텍스는 남아 있다)
레퍼런스 : Topic - Easy way to create doors and windows opening in a wall? - Single Post View

Tuesday, August 20, 2013
Modo에서 Inactive Meshes가 wireframe으로 안보이게 설정하려면
디폴트로는, 현재 오브젝트가 아닌 다른 오브젝트들은 inactive mesh 라고 해서 다음과 같이 와이어프레임으로만 보인다.
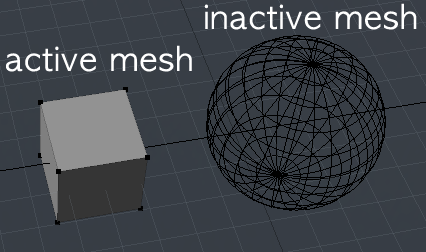
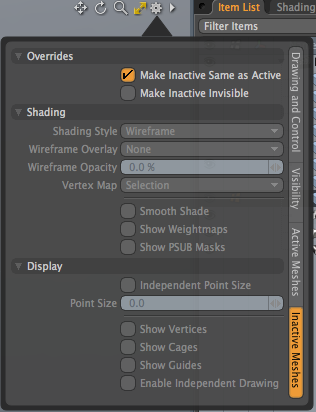
모든 오브젝트를 동일하게 보이게 하려면, 뷰포트 우측 위 기어 모양 아이콘 누르고 다음과 같이
Make inactive same as active 로 설정해주면 된다.
모든 오브젝트를 동일하게 보이게 하려면, 뷰포트 우측 위 기어 모양 아이콘 누르고 다음과 같이
Make inactive same as active 로 설정해주면 된다.
Modo 에서 script 및 pie menu 만들기 기초
modo 에서 실행하는 모든 것들은 명령어로서 실행된다.
그것들은 F5를 누르면 나타나는 command history 에서 확인 가능하다.
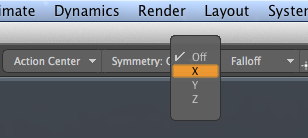
예를 들어 X axis 상의 Symmetry 를 켠다면
그에 해당하는 명령어인 select.symmetryState x 가 command history 에 나타난다.
이 명령을 command 창에서 직접 입력하면 UI 에서 해주는 것과 동일한 결과를 얻는다.
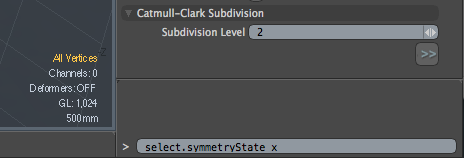
x symmetry 를 켜는 명령어는 select.symmetryState x 이고
symmetry 를 끄는 명령어는 select.symmetryState none 이다.
이들 command 에 shortcut 을 지정하거나 pie menu 에 넣어서 쓰면 편리할 것이다.
더 편리하게 하려면, 이들 각각에 shortcut 을 지정하기보다는 Symmetry 를 켜고 끄는 것을 toggle 시키는 것이 낫겠다.
이는 command 하나로는 안되므로 스크립트를 짜서 해결해보자.
스크립트 작성
modo 는 스크립트 언어로 Perl, Python, Lua 를 지원한다.
여기서는 Python을 이용해 X axis 상의 Symmetry 를 켜고 끄는 스크립트를 짜보자.
텍스트 에디터에서 다음과 같이 스크립트를 짜서
/Users/me/scripts/symmetry.py
똑같은 기능을 perl 로 다음과 같이 짤 수도 있다.
/Users/me/scripts/symmetry.pl
이를 실행하는 방법에는 몇가지가 있는데
1. 스크립트 파일을 직접 여는 방법
Shift + F5 로 파일 다이얼로그를 띄워서 이 파일을 선택해서 실행한다.
2. command 창에서 실행
오른쪽 맨 아래의 command 창에서 다음과 같이 실행한다.
@"/Users/me/scripts/symmetry.py" 또는
@{/Users/me/scripts/symmetry.py}
파일명을 지정 안하고 그냥 @ 를 입력하면 Shift + F5 누를때와 동일한 다이얼로그 박스가 뜬다.
만일 modo 인스톨된 곳의 Scripts 폴더 내에 넣는다면 그냥
@symmetry.py
라고 실행할 수도 있다.
shortcut 과 pie menu 를 지정하면 더 쉽게 실행할 수 있다.
3. shortcut 을 지정해줌
이것을 , 에 shortcut 으로 지정해주자. System > Input Editor 에서 , 키에
@{/Users/me/scripts/symmetry.py}
라고 넣어주면 된다.
자세한 방법은 Modo 에서 새로운 shortcut 을 만드는 방법 을 참조한다.
4. pie menu 에 지정해줌
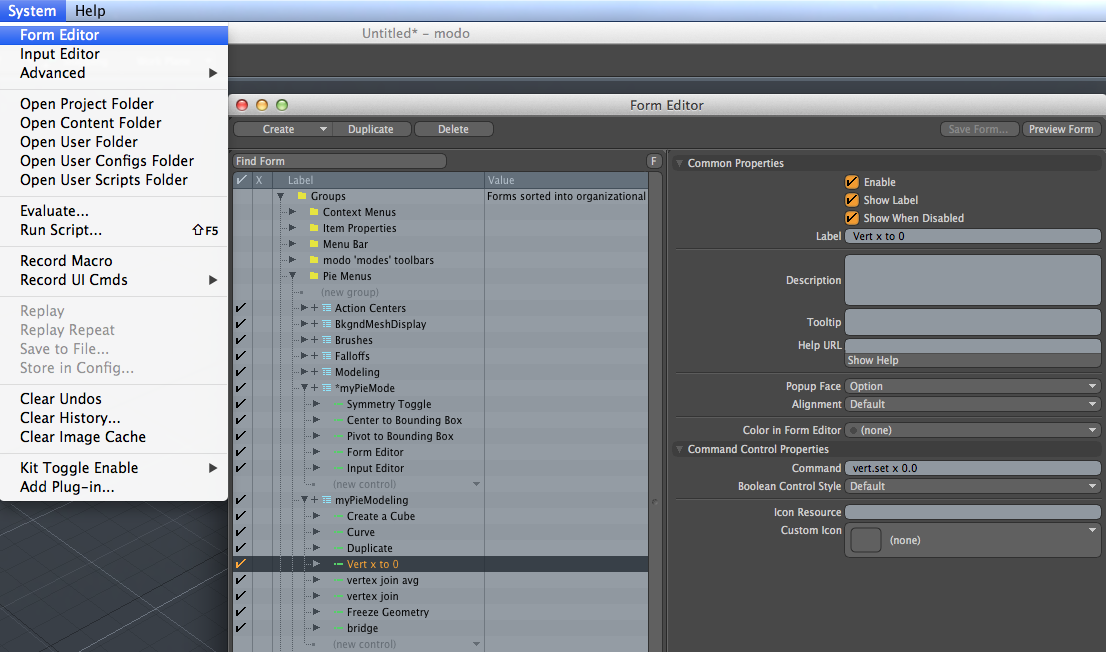
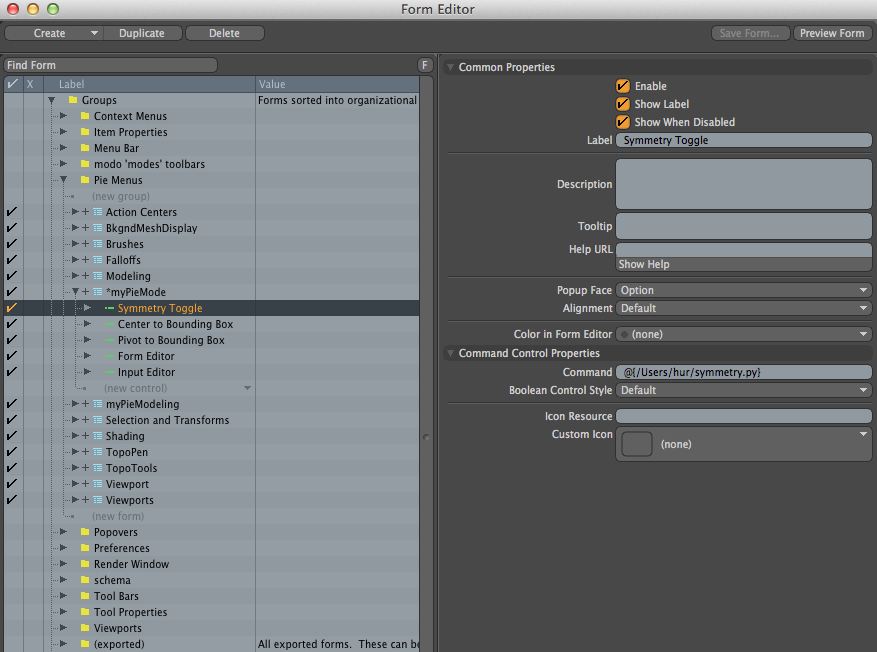
System > Form Editor 를 열고
Pie Menus 밑에 새로운 Form 을 만들어서
(new control) 을 클릭해서 Symmetry Toggle 이라는 이름으로
@{/Users/me/scripts/symmetry.py} 가 실행되도록 만든다.
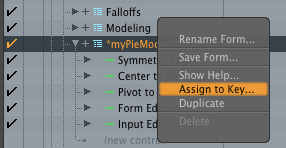
Pie menu 를 만들었으면 오른클릭 > Assign to Key ... 로 핫키를 지정해준다.
자세한 방법은 Modo 에서 custom Pie menu 만드는 법 을 참조한다.
스크립트를 짤 때 터미널에서 텍스트를 출력할 수 있는 기능은 디버깅할때 매우 중요하다.
Hello World 를 출력하는 스크립트를 짜보자.
/Users/me/scripts/helloWorld.py
System > Advanced > Event Log
를 띄우고 helloWorld 를 실행하면 Event Log 에 Hello World! 라고 찍히는게 보인다.
스크립트 짜는 법에 대해 더 알고 싶으면 모도가 인스톨된 폴더 내의
Scripting_and_Commands.pdf
라는 help 파일을 참조한다.
키워드 : 튜토리얼, tutorial, primer, basics
레퍼런스 : Modo Script 관련 자료
그것들은 F5를 누르면 나타나는 command history 에서 확인 가능하다.
예를 들어 X axis 상의 Symmetry 를 켠다면
그에 해당하는 명령어인 select.symmetryState x 가 command history 에 나타난다.
이 명령을 command 창에서 직접 입력하면 UI 에서 해주는 것과 동일한 결과를 얻는다.
x symmetry 를 켜는 명령어는 select.symmetryState x 이고
symmetry 를 끄는 명령어는 select.symmetryState none 이다.
이들 command 에 shortcut 을 지정하거나 pie menu 에 넣어서 쓰면 편리할 것이다.
더 편리하게 하려면, 이들 각각에 shortcut 을 지정하기보다는 Symmetry 를 켜고 끄는 것을 toggle 시키는 것이 낫겠다.
이는 command 하나로는 안되므로 스크립트를 짜서 해결해보자.
스크립트 작성
modo 는 스크립트 언어로 Perl, Python, Lua 를 지원한다.
여기서는 Python을 이용해 X axis 상의 Symmetry 를 켜고 끄는 스크립트를 짜보자.
텍스트 에디터에서 다음과 같이 스크립트를 짜서
 #python
 currentSymm = lx.eval("select.symmetryState ?")
 if currentSymm == 'none':
   lx.eval("select.symmetryState x")
 else:
   lx.eval("select.symmetryState none")
/Users/me/scripts/symmetry.py
똑같은 기능을 perl 로 다음과 같이 짤 수도 있다.
 #perl
 my $currentSymm = lxq("select.symmetryState ?");
 if($currentSymm eq "none")
 {
   lx("select.symmetryState x");
 }
 else
 {
   lx("select.symmetryState none");
 }
/Users/me/scripts/symmetry.pl
이를 실행하는 방법에는 몇가지가 있는데
1. 스크립트 파일을 직접 여는 방법
Shift + F5 로 파일 다이얼로그를 띄워서 이 파일을 선택해서 실행한다.
2. command 창에서 실행
오른쪽 맨 아래의 command 창에서 다음과 같이 실행한다.
@"/Users/me/scripts/symmetry.py" 또는
@{/Users/me/scripts/symmetry.py}
파일명을 지정 안하고 그냥 @ 를 입력하면 Shift + F5 누를때와 동일한 다이얼로그 박스가 뜬다.
만일 modo 인스톨된 곳의 Scripts 폴더 내에 넣는다면 그냥
@symmetry.py
라고 실행할 수도 있다.
shortcut 과 pie menu 를 지정하면 더 쉽게 실행할 수 있다.
3. shortcut 을 지정해줌
이것을 , 에 shortcut 으로 지정해주자. System > Input Editor 에서 , 키에
@{/Users/me/scripts/symmetry.py}
라고 넣어주면 된다.
자세한 방법은 Modo 에서 새로운 shortcut 을 만드는 방법 을 참조한다.
4. pie menu 에 지정해줌
System > Form Editor 를 열고
Pie Menus 밑에 새로운 Form 을 만들어서
(new control) 을 클릭해서 Symmetry Toggle 이라는 이름으로
@{/Users/me/scripts/symmetry.py} 가 실행되도록 만든다.
Pie menu 를 만들었으면 오른클릭 > Assign to Key ... 로 핫키를 지정해준다.
자세한 방법은 Modo 에서 custom Pie menu 만드는 법 을 참조한다.
스크립트를 짤 때 터미널에서 텍스트를 출력할 수 있는 기능은 디버깅할때 매우 중요하다.
Hello World 를 출력하는 스크립트를 짜보자.
 #python
 import lx
 lx.out('Hello World!')
/Users/me/scripts/helloWorld.py
System > Advanced > Event Log
를 띄우고 helloWorld 를 실행하면 Event Log 에 Hello World! 라고 찍히는게 보인다.
스크립트 짜는 법에 대해 더 알고 싶으면 모도가 인스톨된 폴더 내의
Scripting_and_Commands.pdf
라는 help 파일을 참조한다.
키워드 : 튜토리얼, tutorial, primer, basics
레퍼런스 : Modo Script 관련 자료
Modo 에서 custom Pie menu 만드는 법
선택된 Vertex 들의 x 좌표를 모두 0 으로 만드는 기능을 pie menu 에 넣어보자.
Form Editor 를 띄운다. "Pie Menus" 밑에 Form 을 새로 만든다.
Form 밑에 Symmetry Toggle 이라는 이름의 new control 을 만든다.
command 는 @{스크립트 파일 패스} 로 적어준다.
shortcut 을 지정해준다.
이제 다음과 같이 자체 제작한 pie menu 로 사용가능하다.
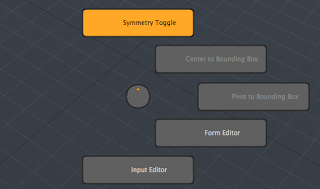
만든 파이 메뉴 및 shortcuts 를 저장하기 위해
File > Config Save (Option + F12) 한다.
Form Editor 를 띄운다. "Pie Menus" 밑에 Form 을 새로 만든다.
Form 밑에 Symmetry Toggle 이라는 이름의 new control 을 만든다.
command 는 @{스크립트 파일 패스} 로 적어준다.
shortcut 을 지정해준다.
이제 다음과 같이 자체 제작한 pie menu 로 사용가능하다.

만든 파이 메뉴 및 shortcuts 를 저장하기 위해
File > Config Save (Option + F12) 한다.
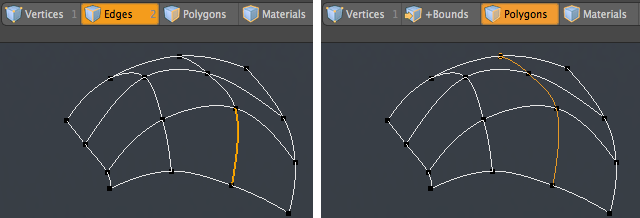
Modo 의 Curve Tool 팁
Curve 의 vertex 들을 p로 이어붙여 다음과 같이 grid 형태를 만들었을 때
Edge mode 에서는 버텍스 사이의 edge 만 선택되고
Polygon mode 에서는 커브 전체가 선택된다.
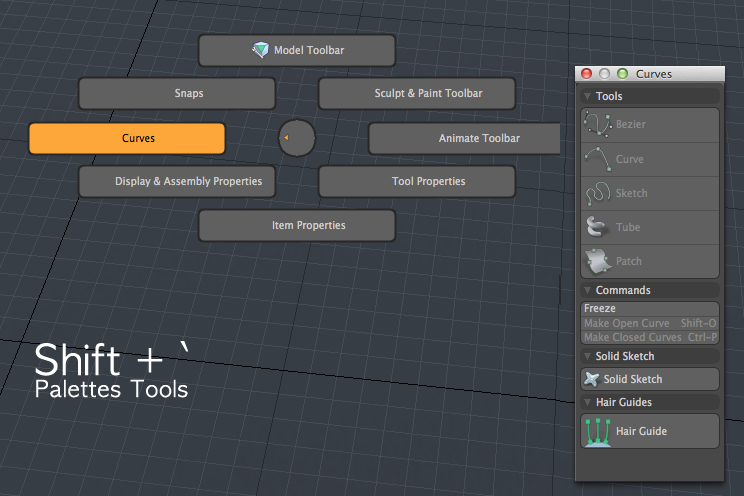
Shift + ` 를 누르면 curve tool 을 포함한 palettes tools 들의 pie menu 가 뜬다.
Edge mode 에서는 버텍스 사이의 edge 만 선택되고
Polygon mode 에서는 커브 전체가 선택된다.
Shift + ` 를 누르면 curve tool 을 포함한 palettes tools 들의 pie menu 가 뜬다.
Sunday, August 18, 2013
Modo Script 관련 자료
검색어 : google > modo script tutorial
레퍼런스 :
Command History panel에 관한 짧은 포스트.
http://the3dninja.com/blog/?p=620
→ 처음 스크립팅 시작할 때는 Command History panel 이 유용하다는 얘기. 그 외에는 별 얘기 없음.
다음은 스크립트로 Hello World 짠것. 그것 뿐임.
Thread: 1st Modo/Python script: Hello world!
http://www.3dallusions.com/forums/modo-scripting/3828-1st-modo-python-script-hello-world.html
다음과 같이 스크립트 짜고
다음은 구체적인 적용 사례 등이 나와 있어 매우 유용함.
How to optimize modo for faster modeling
http://henningsanden.com/2013/03/31/how-to-optimize-modo-for-faster-modeling/
Seneca's scripts
http://www.indigosm.com/modoscripts.htm
→ 꽤 유명한 스크립트인듯.
Learning Modo scripting...
I'm interested in learning Modo scripting as there's a few things I'd like to do but don't really have a great place to start from. I know there's a Wiki but it's somewhat incomplete and I haven't found a really awesome source of info yet. Anyone have any leads on tutorials or how to get started?
- The best method I found is a mix of reading Seneca's scripts - because they're comprehensive and well written - and the documentation that comes with modo. It's also handy to check the command history. Everything you do in modo is logged, giving you the commands sent to the program. If you scale up the little command window in the bottom right, you can get a full list of your command history for that session (under the History tab there).
alphaGeekGirl's modo magic
http://www.alphageekgirl.com/scripts
각종 스크립트들이 소개되어 있음
Modo Script 를 배우려면 Modo 가 인스톨된 폴더에 들어 있는 Scripting_and_Commands.pdf 를 보는 것이 좋음.
사실 이건 modo 601 부터는 obsolete 한 문서이고 최신 문서는 sdk.luxology.com 를 보라고 되어 있지만 정작 여기는 좋은 자료가 없음.
다음은 공식 사이트인데 미완성이고 의외로 별 볼만한 자료가 없음.
http://sdk.luxology.com/wiki
http://sdk.luxology.com/wiki/Scripting
http://sdk.luxology.com/wiki/Command_System
Writing Queryable Commands for Modo
http://www.matt-cox.co.uk/blog/2013/2/17/queryable-commands
http://www.modonize.com/forum/topic.asp?TOPIC_ID=56
http://tech-artists.org/forum/showthread.php?3633-Modo-Scripting-Advice
기타
Using Scripts and Macros in Modo
http://www.vertextutor.com/using-scripts-and-macros-in-modo/
→ 코딩하는 방법이 나온게 아니라 아무 도움이 안됨.
키워드 : Scripting, 스크립트
레퍼런스 :
Command History panel에 관한 짧은 포스트.
http://the3dninja.com/blog/?p=620
→ 처음 스크립팅 시작할 때는 Command History panel 이 유용하다는 얘기. 그 외에는 별 얘기 없음.
다음은 스크립트로 Hello World 짠것. 그것 뿐임.
Thread: 1st Modo/Python script: Hello world!
http://www.3dallusions.com/forums/modo-scripting/3828-1st-modo-python-script-hello-world.html
다음과 같이 스크립트 짜고
 #python
 import lx
 lx.out('Hello World!')
다음은 구체적인 적용 사례 등이 나와 있어 매우 유용함.
How to optimize modo for faster modeling
http://henningsanden.com/2013/03/31/how-to-optimize-modo-for-faster-modeling/
Seneca's scripts
http://www.indigosm.com/modoscripts.htm
→ 꽤 유명한 스크립트인듯.
Learning Modo scripting...
I'm interested in learning Modo scripting as there's a few things I'd like to do but don't really have a great place to start from. I know there's a Wiki but it's somewhat incomplete and I haven't found a really awesome source of info yet. Anyone have any leads on tutorials or how to get started?
- The best method I found is a mix of reading Seneca's scripts - because they're comprehensive and well written - and the documentation that comes with modo. It's also handy to check the command history. Everything you do in modo is logged, giving you the commands sent to the program. If you scale up the little command window in the bottom right, you can get a full list of your command history for that session (under the History tab there).
alphaGeekGirl's modo magic
http://www.alphageekgirl.com/scripts
각종 스크립트들이 소개되어 있음
Modo Script 를 배우려면 Modo 가 인스톨된 폴더에 들어 있는 Scripting_and_Commands.pdf 를 보는 것이 좋음.
사실 이건 modo 601 부터는 obsolete 한 문서이고 최신 문서는 sdk.luxology.com 를 보라고 되어 있지만 정작 여기는 좋은 자료가 없음.
다음은 공식 사이트인데 미완성이고 의외로 별 볼만한 자료가 없음.
http://sdk.luxology.com/wiki
http://sdk.luxology.com/wiki/Scripting
http://sdk.luxology.com/wiki/Command_System
Writing Queryable Commands for Modo
http://www.matt-cox.co.uk/blog/2013/2/17/queryable-commands
http://www.modonize.com/forum/topic.asp?TOPIC_ID=56
http://tech-artists.org/forum/showthread.php?3633-Modo-Scripting-Advice
기타
Using Scripts and Macros in Modo
http://www.vertextutor.com/using-scripts-and-macros-in-modo/
→ 코딩하는 방법이 나온게 아니라 아무 도움이 안됨.
키워드 : Scripting, 스크립트
Modo 에서 새로운 shortcut 을 만드는 방법
예를 들어 join average 를 / 에 shortcut 으로 매핑시킨다고 하자.
그럼 우선 해당 명령어를 알아내기 위해 F5로 command history 창을 띄우고 join average 를 실행해본다.

히스토리 창의 맨 아래쪽을 보면 최근 실행한 명령이 보인다.
join average 하는 명령은 "vert.join true" 라는 것을 것을 알 수 있다. 이것을 카피한다.
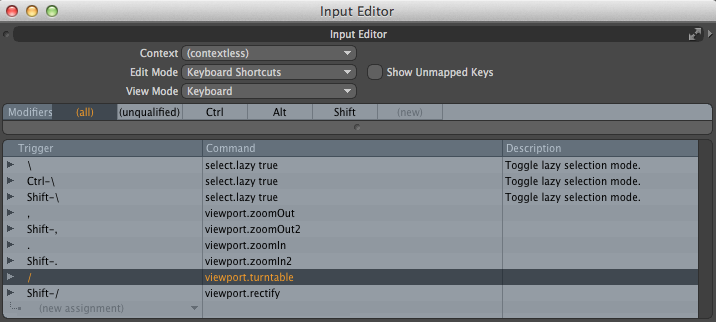
메뉴 > System > Input Editor 를 띄워서
/ 가 있는 곳으로 간다. 디폴트로는 턴테이블 기능으로 돼있는데 잘 안쓰는 기능이므로 여기에 join average 를 매핑해주기로 한다.
다음과 같이 "vert.join true"를 paste 하면, 핫키가 새로 매핑된다.
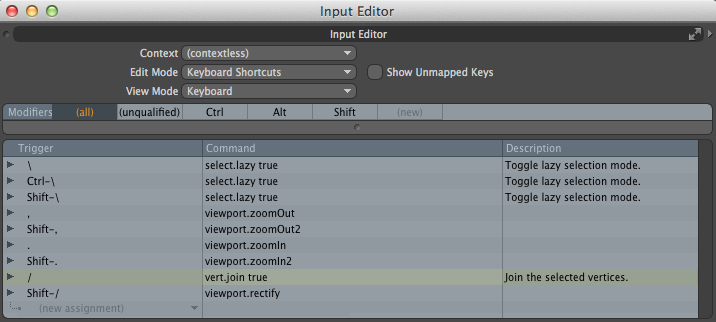
이제 join average 명령을 / 만 눌러서 간편히 실행할 수 있다.
키워드 : create new shortcuts, hotkeys, mapping, remap, remapping
레퍼런스 : Scripting in modo : Using the Command History
그럼 우선 해당 명령어를 알아내기 위해 F5로 command history 창을 띄우고 join average 를 실행해본다.
히스토리 창의 맨 아래쪽을 보면 최근 실행한 명령이 보인다.
join average 하는 명령은 "vert.join true" 라는 것을 것을 알 수 있다. 이것을 카피한다.
메뉴 > System > Input Editor 를 띄워서
/ 가 있는 곳으로 간다. 디폴트로는 턴테이블 기능으로 돼있는데 잘 안쓰는 기능이므로 여기에 join average 를 매핑해주기로 한다.
다음과 같이 "vert.join true"를 paste 하면, 핫키가 새로 매핑된다.
이제 join average 명령을 / 만 눌러서 간편히 실행할 수 있다.
키워드 : create new shortcuts, hotkeys, mapping, remap, remapping
레퍼런스 : Scripting in modo : Using the Command History
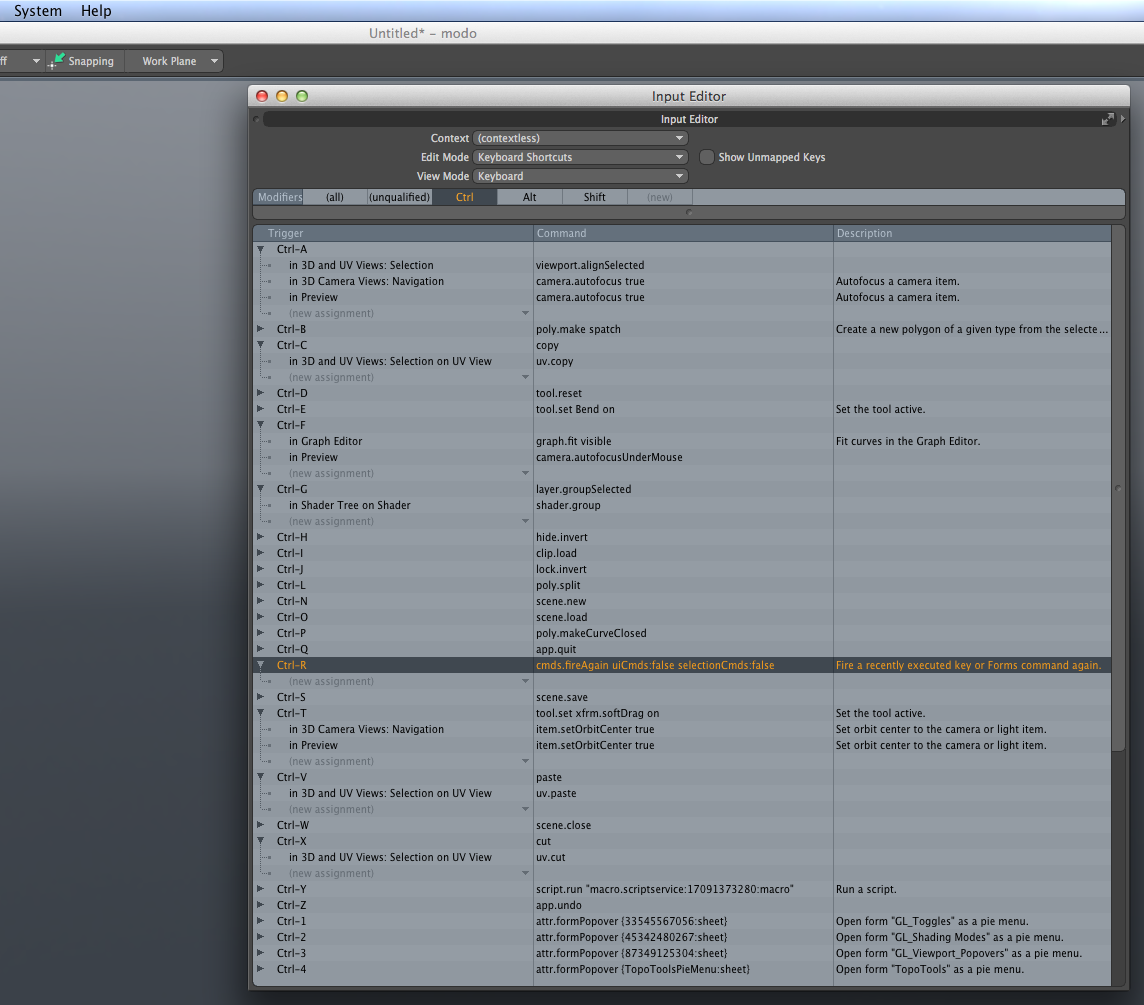
Modo 에서 keyboard shortcut 을 customize 하려면
Modo 에서는 Ctrl + R 이 repeat last command 기능인데 Maya 처럼 G 로 핫키를 바꿔주는게 편하다.
Shortcut 을 고쳐주려면 다음과 같이 한다.
Menu > System > Input Editor 실행.
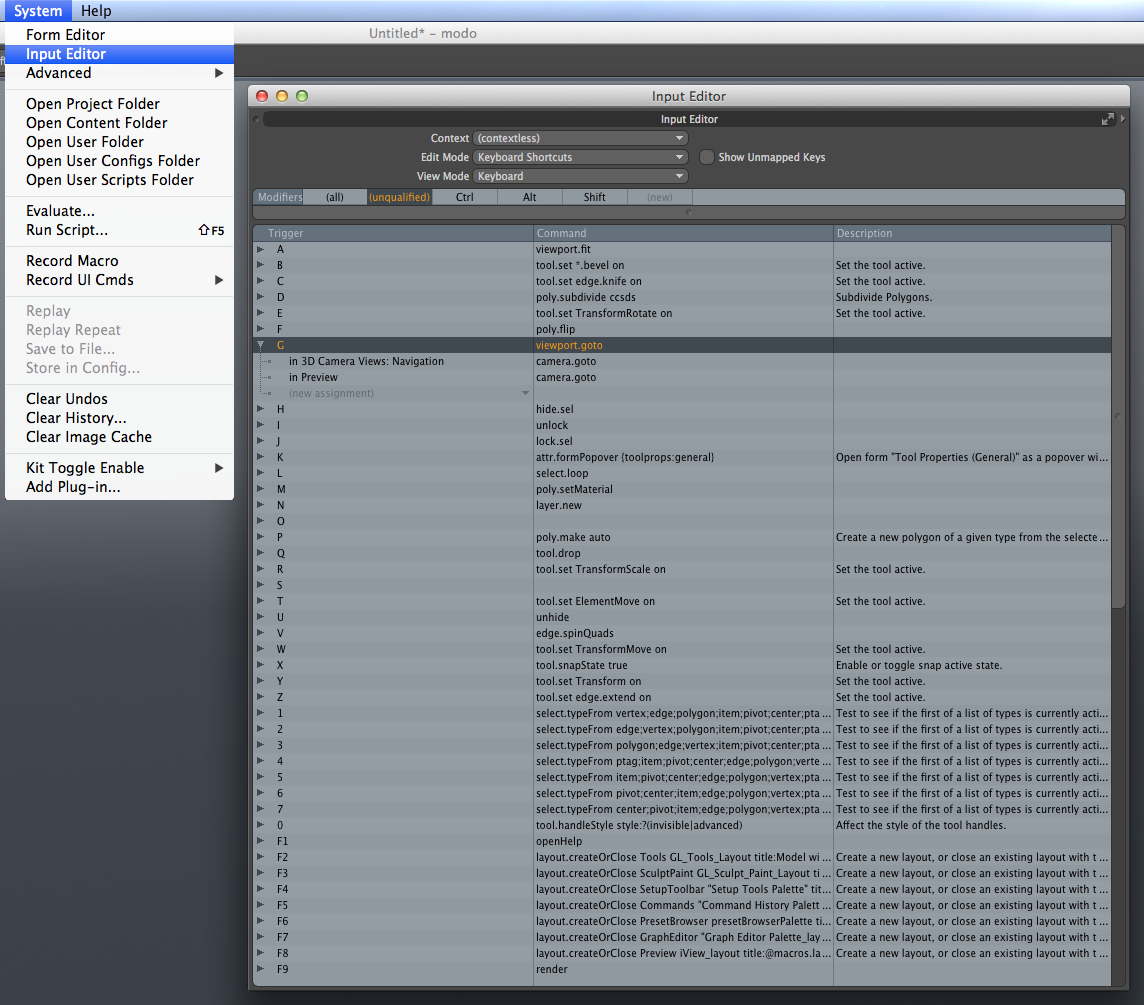
여기서 G 에 해당하는 shortcut 을 Ctrl + R 에 해당하는 기능으로 고쳐주어야 한다.
다음과 같이 Ctrl + R 에 해당하는 기능을 찾아가 그 이름을 copy 한다.
그것을 핫키 G 에 paste 해준다.
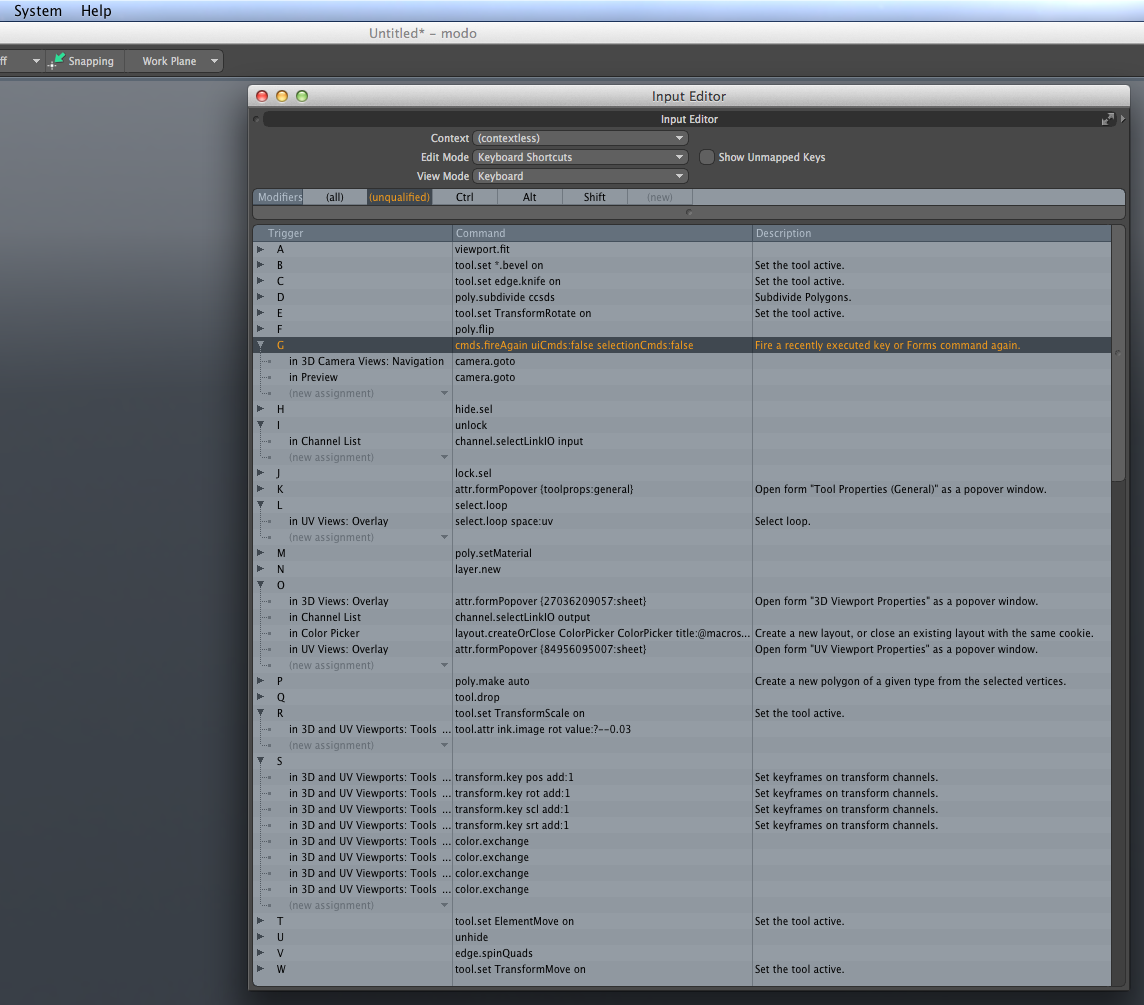
이제 repeat last command 기능은 G에 의해 trigger 되도록 바뀌었다.
레퍼런스 : How to Optimize modo for Faster Modeling
키워드 : remap shortcuts
Shortcut 을 고쳐주려면 다음과 같이 한다.
Menu > System > Input Editor 실행.
여기서 G 에 해당하는 shortcut 을 Ctrl + R 에 해당하는 기능으로 고쳐주어야 한다.
다음과 같이 Ctrl + R 에 해당하는 기능을 찾아가 그 이름을 copy 한다.
그것을 핫키 G 에 paste 해준다.
이제 repeat last command 기능은 G에 의해 trigger 되도록 바뀌었다.
레퍼런스 : How to Optimize modo for Faster Modeling
키워드 : remap shortcuts
Thursday, August 15, 2013
뷰포트에 표시되는 버텍스 사이즈를 좀더 크게 하려면
Preference 의 OpenGL point size 값을 높여주면 된다.
 키워드 : verts size, vertex, 크기, 사이즈
Modo 에서 특정 부위를 lock 하는 법
j 를 치면 선택영역이 lock 되어 더 edit 할수 없게 된다.
i 를 치면 해당 아이템의 모든 lock 된 것들이 unlock 된다.
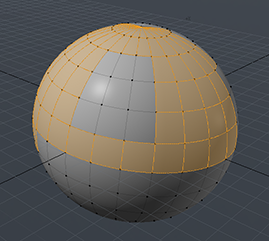
sphere 를 절반 정도 lasso 로 선택한 모습. lock 한 부분은 선택 안된 그대로이다.
i 를 치면 해당 아이템의 모든 lock 된 것들이 unlock 된다.
sphere 를 절반 정도 lasso 로 선택한 모습. lock 한 부분은 선택 안된 그대로이다.
Modo 에서 Trackball Rotation 끄는 법
viewport 오른쪽 위에서 다음과 같이 Trackball Rotation 을 No 로 해줌
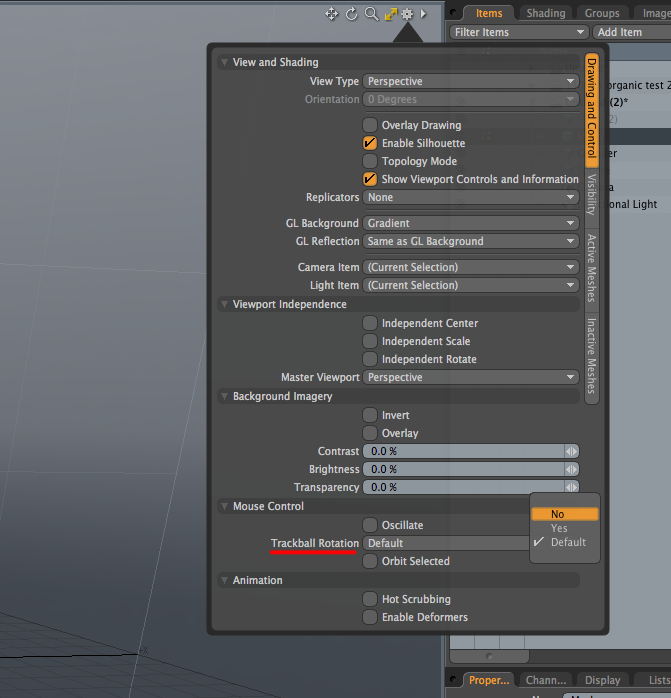
또는 Preferences > OpenGL > Trackball Rotation 체크 끔
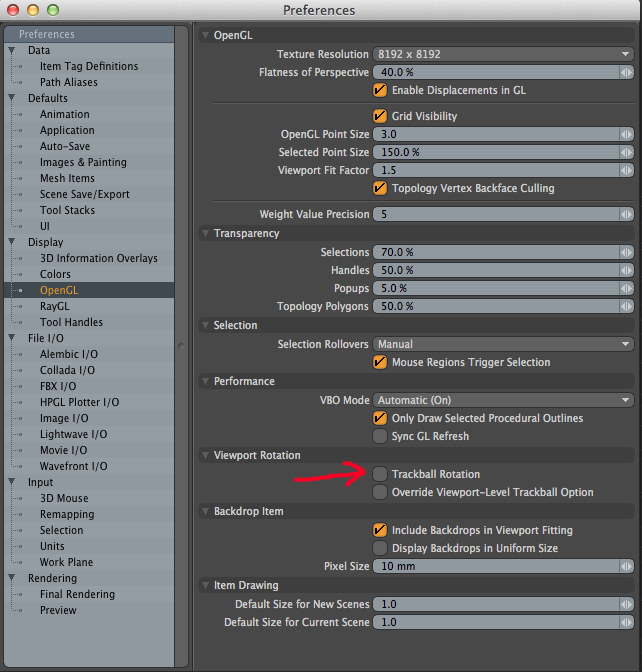
또는 Preferences > OpenGL > Trackball Rotation 체크 끔

Modo viewport 의 렌더링 모드 바꾸는 방법
Ctrl + 2 누르면 render mode 바꾸는 pie menu 뜬다.
여기서 Advanced GL 또는 Wire 를 선택하면 된다.
여기서 Advanced GL 또는 Wire 를 선택하면 된다.
Monday, August 12, 2013
Subscribe to:
Posts (Atom)